Tuesday, July 31, 2012

Combining Sterling and Fine Silver Clays

I still get blank looks sometimes from people who think that different silver clays cannot be mixed. From a chemistry point of view, all the silver clays are totally compatible, with the caveat of potential shrinkage mismatch. I routinely mix Art Clay syringe with PMC clay. The very first piece I made in sterling clay had a bit of fine silver syringe work added. Yesterday I loaded up the kiln with sterling and threw in a couple of pieces that have been on my bench for months. They were in an area of my bench that I've come to reserve for sterling clay, so I slapped sterling hallmarks on the back and fired away.

Fine silver clay with sterling clay applied
After the first stage open shelf firing, it was obvious that they were actually fine silver. The color of the two green clays is pretty different, with the fine silver being whiter, but these had sat out long enough to darken due to sulphur from the air. After the first stage firing, the two pieces were bright white, while all the others were even darker gray. No fear! The sterling hallmark still needed to be fired in carbon, so I packaged them all up and fired again.

Sterling clay components (and a couple of fine silver)
fresh from the kiln

The sterling comes out of the carbon with a light golden color, which cleans right off.  The fine silver components come out bright white. Once it's all polished and patinated, the difference is less obvious.

Monday, July 30, 2012

Sketchbook Designs for New Jewelry

New designs are in the works. It's interesting that my approach to designing jewelry is a bit different than my approach to designing quilts. With quilts, I very much design on the fly, usually starting with a small central piece and then letting the piece get larger and larger by adding more around the edges, or working in a grid of smaller pieces. Perhaps because jewelry just can't be seven feet square, I don't 'grow' it in a similar way. Most of the time I actually draw designs in my sketchbook and then make a piece quite similar to the concept. Yes, things change as a I problem solve, but mostly I have a pretty good idea how the piece is going to come out.


This new design is returning to my cache of enamels. I adored my workshop more than a year ago with Charity Hall, where I learned new enamel techniques that allowed me to layer color and design to build up tiny compositions very like my journal pages. I actually made a piece from fine silver clay to mount one of my favorite enamels from the class, but had some non-symmetrical shrinkage that caused the piece to come out of the kiln substantially not round. That reminded me why I usually make my bezels in metal clay first and then dap the copper to fit before I do the enameling. Yes, I could get better at planning for shrinkage for metal clay, but Argentium seems like the perfect fix. I'll build the setting for the enamel with sheet and wire, and attach it to the larger piece with a granulation border.

I think the design reminds me of echinacea flowers, so I may have to make a new flower enamel to insert. But perhaps it's a perfect way to merge the flowers I've been playing with lately with my trademark birds.

Sunday, July 29, 2012

Amethyst Starling Brooch

Naming jewelry is always a tricky thing. I want a name that connects to the piece somehow, but after using birds in my jewelry for years, I'm having more difficulty with originality. This morning, after staring at the latest brooch, which I eventually set yesterday with rose-cut amethysts, because those were the stones I had in my stash that fit best, I was stumped. But Google is my friend, as a quick search for amethyst+bird turned up an amethyst starling, which I'd just seen in my Pinterest feed. So there you are.  Serendipity.

Amethyst Starling brooch/pendant
©2012 Vickie Hallmark
sterling silver & rose-cut amethyst
Amethyst Starling brooch/pendant, reverse
©2012 Vickie Hallmark
sterling silver & rose-cut amethyst

Thursday, July 26, 2012

Moonflower Earrings

I'm trying out lots of new designs, just seeing what all I can do with the Argentium plus metal clay.  The latest have some soldering, since the small flower is placed on top of the large flower and leaves and doesn't really touch the Argentium enough to fuse securely. In retrospect, I should build the entire flower and leaf assembly in clay and fire it together, but in this case I used flower and leaf components. Chalk this time consuming pair up to experience.

Moonflower earrings
©2012 Vickie Hallmark
fine silver flowers and leaves fused to Argentium sterling,

chalcedony drops


Wednesday, July 25, 2012

Silver Lining Brooch Replacement Finished

Silver Lining, version 2, came through the firings nicely. I reduced my first stage firing ramp to 800°F per hour, as recommended for Celie Fago to eliminate blistering in the sterling clay firing. I still had a few tiny blisters on some pieces, but definitely improved.

Silver Lining brooch, front
©2012 Vickie Hallmark
sterling silver
Silver Lining brooch, back
©2012 Vickie Hallmark
sterling silver

Monday, July 23, 2012

Earring Madness

I've been trying to get into a groove with earrings, both metal clay and Argentium. I just keep working back and forth between the two. For Argentium, I'm fusing on fine silver. For the metal clay earrings, I'm working with sterling clay. My kiln is staying very busy between the two. More on the way.

Flower Basket earrings
©2012 Vickie Hallmark
fine silver flower sand leaves fused to Argentium sheet and wire
Dark Flock earrings
©2012 Vickie Hallmark
sterling silver
Leaf Nest earrings
©2012 Vickie Hallmark sterling silver clay


Sunday, July 22, 2012

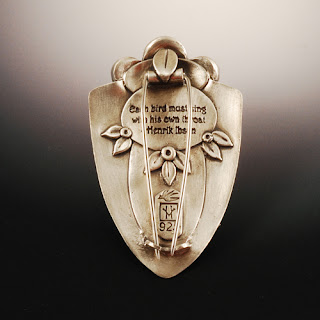
Behind the Brooch

I have been plugging away at several new brooches, because I want plenty to select from when I submit images to "Behind the Brooch," a CraftHaus online exhibit organized by my friend Lorena Angulo. The point of the exhibit is that the back is just as important as the front of the brooch. I always lavish love on the backs of my artwork. I think half the reason I won national art quilt awards back in the day was that I took the philosophy that the back was another canvas and made the quilts truly double sided. If you ever visit Paducah, KY, stop by the National Quilt Museum to see if my quilt, Enlightenment, is on display and ask to see the back. Or for a time now, you can see another of my double-sided quilts, Tailspin, as part of the Texas Quilts Today exhibit at the Texas Quilt Museum in La Grange.


I've returned to sterling clay for two new brooches (and a lot of other new work). The first is Silver Lining 2, which will replace the first Silver Lining which suffered from slight blistering on the back. Of course, remakes always get upgraded a little, so I took the opportunity to add a quote to the back of this version: "Every cloud has a silver lining." The first Silver Lining will be reclaimed.


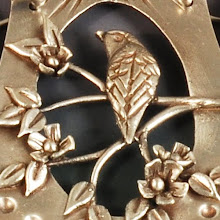
The other new brooch began with a window piece that lay on my bench for months. I decided it needed to not be open after all, because I wanted that back canvas to work on. So I added a textured oval to the background, and then set to work on the reverse.


I wanted this piece to be worn as either a brooch or a pendant, so the vertical format works better. The large leaf at the top over the pin hinge forms a bail for a chain.


I love the strength of sterling clay. I would never form such delicate pin mechanisms in fine silver. The mystery with this piece will be how the shrinkage works out with those fine silver bezel cups affixed, which won't shrink. I expect some movement. 

Thursday, July 19, 2012

Argentium Granulation

One of the wonderful possibilities with Argentium silver is the possibility to do fused granulation. This ancient decorative technique is typically executed in 22K gold. According to Ronda Coryell, Argentium behaves much more like 22K gold than like traditional sterling silver.

Sunflower pendant
©2012 Vickie Hallmark
fine silver flower fused to Argentium sheet and wire
 with Argentium granulation

For my Sunflower pendant, I combined a simple round base with a granulation border with a fine silver sunflower and granulated Argentium flower center. The leaf drop is also metal clay.

Wednesday, July 18, 2012

Argentium Silver - Learning Resources 1

Because many fellow artists have inquired about Argentium silver, I thought I'd start compiling a list of resources with information about working with Argentium.


The obvious place to start is the Argentium Silver Guild. Their tech tips sheet advises that Argentium is different from conventional sterling in that it glows a paler color when heated and cools more slowly than traditional sterling, which translates to using more care when heating and quenching.


Argentium is more ductile than traditional sterling, giving better forming and engraving properties.  Heat-hardening can be used with Argentium to produce a much higher hardness than traditional sterling. Joining can be accomplished with soldering, with a few caveats compared to traditional methods, but the ability to fuse Argentium to other metals, including fine silver, gold, platinum, copper, brass & steel is a marked departure from regular sterling.


Casting with Argentium sterling requires a few modifications due to its different cooling properties. Polishing with the aim of maximizing the huge advantage of Argentium's tarnish resistance requires a bit of forethought, since some procedures may remove the protective germanium oxide layer passivation layer. Formation of this layer can be accelerated by heat treatment.

PDF  and video guides are available at the Guild download center. These include video clips from Ronda Coryell's excellent video series.

Monday, July 16, 2012

Druzy Stone Hokey Pokey

You put your druzy stone in,
You put your druzy stone out,
You put your druzy stone in,
And you shake it all about,
You do the hokey pokey
and you turn your stone around
That what it's all about.

Bird Song brooch
©2012 Vickie Hallmark
fine silver bird and leaves fused to
Argentium sheet and wire,
hemimorphite druzy and CZ

The Bird Song brooch is finished. Not to say that it turned out well, but it's finished. Multiple mistakes on my part have made it a piece to put into my learning curve pile, not into my jewelry box. 

Elements of this project that I'm proud of:
  1. Design. Clearly, my design skills outweigh my fabrication skills, but the latter will improve.
  2. innovation. Fusing metal clay with Argentium is new territory and I'm blazing the trail for myself, not following an easy path laid by others.
  3. Skills. True, my fabrication skill is less than stellar, but I am improving.
  4. Voice. My work clearly has my personal voice. It doesn't look like anybody else's. I can't blame my errors on any one else.
Bird Song brooch, reverse
©2012 Vickie Hallmark
fine silver bird and leaves fused to
Argentium sheet and wire,
hemimorphite druzy and CZ

Lessons I've learned from this project:

  1. Gold should be added to silver late in the process. Otherwise, there's a distressing tendency to turn gold into silver. Not the desired alchemist direction.
  2. Solder is my friend for fixing errors.
  3. Something will undoubtedly move out of place when the flux bubbles. The more components to check, the more likely I will miss one when warming and nudging.
  4. Even, thorough heating for fusing is easier than it sounds. Any little deviances will result in bits popping off later at inopportune times.
  5. When in doubt, solder it! See #2 and #4.
  6. Surprises happen. Air gets trapped below sweat soldered pieces of fine silver on Argentium, and may expand when reheated later. 
  7. Triangular cabochons are harder to set than round or oval. Duh!
  8. Heavier bezels are a good thing, so that when the bezel gets mutilated by taking the stone in and out multiple times, there's plenty of material for filing and sanding. 
  9. When everything is almost finished, something else will go wrong.
  10. Distraction leads to flaky black patina. Flaky black patina requires major sanding and never seems to patina nicely again.
  11. Druzy stones inevitably invite the hammer handpiece to hit them, typically on the very final stroke.
  12. CZ stones are not invulnerable to heavy sanding and polishing, see #10.
  13. The polisher will inevitably skip off the area to be highlighted and hit the background intended to stay black.
  14. Hemimorphite doesn't like chemicals, which affect both its color and the druzy surface. LOS is a chemical.

Saturday, July 14, 2012

Simple Argentium + Fine Silver Earrings

My Argentium sterling experiments continue with simple earrings made from sheet and wire with added sculptural elements made from fine silver clay. These flower earrings are as simple as it gets. A generic five-petal flower and two leaves pasted together and fired, then fused onto the Argentium base, cut out and finished.  Fast and easy.

Flower Earrings
©2012 Vickie Hallmark
fine silver flowers and leaves fused to Argentium sheet and wire

Monday, July 09, 2012

Troubles with Fusing Gold to Argentium

“No plan survives contact with the enemy.” — Field Marshal Helmuth von Moltke
Every mistake is a design opportunity. 

And so it goes in the battle of learning Argentium silver. When I attempted to fuse the fine silver and gold pieces onto the Argentium base, the gold sank right into the silver at the top of the brooch and seemed to alloy to the point of not even being able to see it.  Ronda had warned me that the gold would tend to heat faster and cause issues. Now I see what she meant.  I ground out the remains and replaced the gold, thinking that I would add the one piece carefully and stop earlier, but again it got away from me. This large piece is clearly hard to heat and monitor evenly. And in the course of trying to stop short for the sake of the gold, I fear I have under-fused other pieces onto the Argentium. That became clear when I started cutting out the brooch and a few granules popped off. 
©2012 Vickie Hallmark
Carly brooch, gold removed
Argentium sterling with fine silver
So now I've cut off all the troublesome parts and soldered on large granule decorations along the edge. I'm reading this as a case of gold being superfluous to this design, so I'm sticking with all silver. 
©2012 Vickie Hallmark
Carly brooch, reverse
Argentium sterling with fine silver
The open, soldered granules give a lot more interest to the back of the brooch, so perhaps the lost battle is a good thing in the long run. The quote and hallmark are also in place, and now it's time to finesse the fit on the stone. 


Working with traditional fabrication is frustrating in some ways. I'd hoped that using Argentium for the majority of the work would reduce materials costs, but so far I'd say that's far offset by labor costs. Hopefully, my experience will improve my success rate. I know I can make what I see in my head with metal clay, but the combination of metal clay with Argentium is still a learning process for me.

Friday, July 06, 2012

Bird Song Brooch in Progress

The second of my quote brooches is coming slowly along. Last night I fired a couple of birds, the quote and hallmark, and a pile of fallen leaves. This morning I'm arranging these fine silver components onto the Argentium base that I previously constructed. You can see the bezel for the triangular hemimorphite druzy in place at the bottom right.


If you look closely, you'll also see 18K gold hammered granules at the top and next to the bezel. I'm about to go cut tubing for the "berry" tube set stones. These will all be fused in place before I flip the brooch over and start adding the back pieces with solder.

To see the sketch with the druzy, visit the post about stone inspiration. I'm debating a departure from my normal naming scheme, which always includes "bird," to one referencing the author. Since this piece will have a quote from Carly Simon on the back, which you can see in my texture design process, I'm thinking it might be the Carly brooch. What do you think? Carly or Bird Song?

Tuesday, July 03, 2012

Fuchsia Bud Earrings

I love the fact that the shape of these earrings echoes the fuchsia design. I definitely want to expand these ideas more.


Monday, July 02, 2012

First Fuchsia Earrings Completed

The fuchsias worked perfectly. I had feared that the fine (26 gauge) beaded wire stamens might heat too quickly and not fuse well, but there was no issue with that. The only problem was movement of some elements. When the flux bubbles up on initial heating, small pieces often move. It's more a matter of training myself to be patient and check every little detail. Anything that moves has to be patiently moved back into position with a solder pick while simultaneously heating with a torch to make the flux fluid at high temperature. There's some skill involved, of which I am not yet the master. More earrings should help with that!

©2012 Vickie Hallmark
fine silver fuchsias and leaves
fused to Argentium sheet and wire

Sunday, July 01, 2012

New Designs: Fuchsias

I'm revisiting fuchsia flowers, with which I have a periodic history. Everytime I see them in the nursery here in the spring, I have flashbacks to a patio full of them when we lived in California. Luckily, I snap out of it and remind myself that I now live under the Texas death star.

fuchsia earring sketches
 Yesterday, while drawing up some new simpler earring designs, I thought that maybe fuchsias would be fun and possibly easier to make than birds. Notice the bud shape on the pair of earrings to the right -- I think that's where the idea came from. My birds are hand-formed, and they just keep getting more and more detailed. To make some lower cost earrings, I need to cut my labor down.

fuchsia flowers & leave (& 1 bud)
hand formed from fine silver clay
waiting to be cleaned and fired
Fuchsias were easier to do that I thought they might be, after I ran through several experiments on  how to make the sepals and petals. Today I will make the stamens, fire the flowers, and then try fusing the fine silver onto the argentium bases.