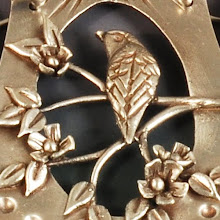
I love keum boo for applying a touch of gold, but sometimes I want a more intricate design. Aura 22 is a gold clay slip. After firing silver, you simply paint it on and refire. The bird on this pendant would have been easy with keum boo, but I tried the Aura 22 because of the gold berries. Unfortunately, three coats of the paste didn't give a very strong gold color. I added another 2 coats to the bird, which finally made it pop out nicely.
During the course of firing the enamel though, the gold seemed to fade in areas. Probably I should have done the gold last, since it's fired at a much lower temperature than the enamel. Add that to my basket of things learned.
I'm still happy with the pendant though.
Thursday, October 30, 2008
Trying Aura 22
Monday, October 13, 2008
Enamel on Metal Clay: Learning the Hard Way
What I've learned:
1. Egg yellow transparent enamel over gold keum boo is not yellow. It's an ugly, ugly, deep butterscotch.
2. Removing ugly enamel from metal clay is a pain. I used diamond hand pads for the flat panel, but had to use a diamond burr for the panel that had raised silver balls. In both cases I could only remove the surface enamel and had to leave the enamel in the crevices. Work wet!
3. It's hard to remove enamel from the surface without removing more from the edges than the center.
4. Removing enamel from keum boo removes some of the gold, no matter how careful you are.
5. Enamel is likely to fill pre-drilled holes. Clean before fireing.
6. Any bits of enamel fired into pre-drilled holes will need to be drilled out with a diamond bit.
7. Cheap diamond drills don't work very well on enamel (nor on regular glass).
8. Diamond bits probably won't be the right size for the intended silver wire rivets.
9. Using a center punch on enamel to set a drill bit will fracture the enamel around the hole.
10. Those wrong size holes will require making some tiny decorative washers to fit the wire rivets.
11. If you make the exact number of needed washers, one will be dropped into a black hole before it can be installed (even if you were successful at finding the thing in the tumbler shot!).
12. Cutting tiny sterling tubes for the rivets is easy with a cut-off saw, but holding the little rascals to file smooth is another matter. My solution: put a drill bit inside the tube, extend tube just beyond end and hold there while filing gently.
13. Balling up the opposite end of the rivet with a Little Torch works as well as the lost washers. Actually it looks nicer, except that the enamel around the hole darkens. Plan accordingly.
14. Glossy enamel looks really different than matte polished enamel.
15. The whole thing is easier the second time round!

Saturday, October 11, 2008
Color Always Helps
Try number three for the silver clay pendant. First I did random gold patches, then I filled the center with more gold. I wasn't happy with the look. I tried sanding off gold on the high points, thinking that the silver and gold relief might look nice, but the lip around the outside prevented getting a nice even removal.
So, as with any art process, when nothing is working, just change it up. Add something. How about some color?
Part of my birthday haul included the metal enamels that I regretted not purchasing at the Purdue Conference. Yesterday I got to work trying them out.
I first tried one of the simple shield pairs I'm going to make into earrings. I torch fired these. I think the right one needs to be fired a bit more since it's grainy still (alternatively, I overfired it), but overall I thought they turned out well enough for my first try. I'm thinking they'll look fabulous with some simple blue/green dichroic glass beads.
So I decided to go for it on the pendant. It's a bit of a waste of the gold underlayer, but it was either that or fire to remove the gold completely anyway. I'm happier with it this way, but keep thinking maybe it needs to be more uniformly colored. I can always add more enamel and refire. I was trying to highlight the bird, but it's hard to make out. I have concluded that tear-away textures are fabulous for under enamel. Next I've been working on a koi pendant in silver (it's that cross-discipline thing again -- make a fish in glass, make one in metal). I now have a long list of things NOT to do. Very reminiscent of the bird nest locket. I need to start making the second iterations of these pieces, so that I can see how they are really supposed to look.
Photos tomorrow maybe, if I get the thing riveted together in the morning.
Wednesday, October 08, 2008
Flower Art

The only art I've done recently involved flowers, a LOT of flowers, for my niece's wedding! I spent two days this past weekend working (I was one of several assistants) on table centerpieces, huge urns of blossoms, and attendant bouquets. It was gorgeous. I personally made 8 of 24 small centerpieces like those on the left, three larger ones on the right, four more even larger display urns, and three bridesmaid bouquets.
 Almost too many flowers, as we worked right up almost to the start of the ceremony. I did not get the photos I would have liked beforehand and had to scavenge from friends and family.
It was a fairytale wedding, with a breathtaking bride and handsome groom. Congratulations, Allison and Jesse!
Thursday, October 02, 2008
Keum Boo revision

I wasn't happy with the random placement of gold on the shield pendant, so I put it back through the kiln for 5 minutes at 1350. It came out looking white again, like freshly sintered metal clay. All liver of sulfur (LOS) black was gone. The gold was still present, which surprised me.
So I decided to add more gold. I fished out all my little bits and pieces and set about patchworking together the surface. Now I have it pretty much covered, with a few small silver spots that became more obvious after dunking in LOS again. I'm still not really happy with it, since I think it's too much gold. The imagery is obscured. If I'd left it silver I would be able to patina and polish the highlights to bring out the image. I thought one of the charms of the random gold would be multiple layers in places and therefore different colors of gold after the patina soaked through. If you look closely it's there but not overly attractive.
So now I must decide: leave it as is, refire and fix the few bare spots, or refire hot enough to remove the gold from the surface. ??
Wednesday, October 01, 2008
Bronze Patina
 I put the new bronze pieces through two hours of tumbling with stainless steel shot to refine the somewhat rough texture from the tear-away sheets. Then I tried torch patinating-- I used a small butane torch to oxidize the surface. I could get gorgeous colors in the flame, but when the metal cooled the color rapidly faded. I was able to retain some color, but not strong color.
I then worked with liver of sulfur, which resulted in a deep rich bronze color. Finally, I buffed the surface with 1200 grit polishing paper to bring out highlights.
So, which do you like better? The green and red patina straight from the kiln, or the polished, weathered bronze patina?


