I've become quite take with super black patina for silver, such as seen in the jewelry of Allyson Bone:
or Natasha Wozniak:
or Jayne Redmond, among others:
So, I decided to try to get a deep dark black on the front piece for my stilt rivet brooch. I'm going to polish off highlights on the branches, I think, as I love the idea of reversing contrast between the bright white of the faux bone with black behind black with silver highlights on top. That brings back memories of quilting, where reversing values at a border was a favorite technique for me.
Next step: stilts/tubes/offsets of some kind with rivets.
Showing posts with label faux bone. Show all posts
Showing posts with label faux bone. Show all posts
Wednesday, September 16, 2009
Black Patina for Silver


Monday, September 14, 2009
Art Overcomes Computer Afflictions
Finally, I've recovered a bit from the computer crash. I still have a long list of software in need of installation, such as the Eye Fi card that I love so much, which sends my photos to the computer by wireless, and the HTML editor and ftp uploader for my website.
Photoshop 6 doesn't seem to install on my 64 bit Vista machine, so while DH researches that issue (supposedly solvable), I'm learning Photoshop Elements. It seems to have everything I use; it's just a bit different. Big sigh. 
The last couple of weeks have just been filled with trials. I successfully unloaded my 1" belt sander and used it to rough shape the faux bone for my stilt rivet brooch. After what seemed a long time with first a file and then many grades of wet sandpaper, I had the piece ready to carve. The front carving of the moon and branches, with Dockyard microcarvers was easy.
I tried various bits in my flex shaft on a scrap of faux bone, until I could carve my bird and branch motif to my satisfaction. Of course, when I went to do this on the real piece of faux bone, the bit seemed dull and dug ugly tracks randomly along my nice lines. Another big sigh.
Finally last night, I mustered courage, stopped procrastinating, and returned to the belt sander and handwork, removing all the scuzzy carving. An hour later, I went to bed happy that I was ready to engrave today. A bit more sanding in the light removed the scratches I couldn't see last night, and then my new Dremel engraver made the work of drawing my design extremely easy. A bit of paint in the low spots, and more sanding to remove paint on the high spots, and now I see the extra details that I want to clean up and add.
Back to work! Yeah! No more big sighs!
P.S. This faux bone piece goes underneath a silver clay piece shown here and in these sketches.
Sunday, August 30, 2009
Nightbird

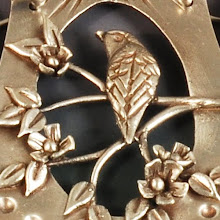
I was so excited about the new brooch design that yesterday, after I made the silver parts for a Garden Windows Pendant class sample, I had to give it a go.
It's really a very simple design, with a smooth window surround and handformed branches and leaves. I wanted to support the bird and branches going across the window at the same height as the rest of the piece, so I tucked some cardstock under that area. I should have cut a piece of teflon sheet to go there as well, but instead I unthinkingly stuck all those delicate parts to the cardstock. I debated firing it with the paper intact and finishing after, but I really wanted to reinforce from the back. You can tell where this is going...
I broke several of the branches and spent way too much time repairing, rebreaking, and repairing again, before I finally got all three pieces into kiln last night. Humph,I thought I'd cut out a bunch of earrings to go in as well!
This is just out of the kiln, with only a little brass brushing. I decided to go with the smooth surface on this brooch, so that I could do a little hand sketching on it. All those scratches you might see are deliberate scratches on my part, rather like the scratch marks I will use for texture on faux bone back, to take color. You can see what I mean in the drawings of the previous post. These will be clearly intentional when the patina brings them out.
I've been really thinking about the metal clay process lately. I want to make sure that my work really NEEDS to be metal clay. I keep asking myself with everything I make, "Could I do this with other metal processes? If so, then it shouldn't be metal clay." The smooth surface on this piece has that issue -- why isn't it sheet sterling? Well, because I can't sketch easily like that on sterling, nor can I form and attach the bird, branches and leaves easily in sterling.
I'm ready to move on to faux bone, which I loved when I took a workshop with Robert Dancik. I bought a pack of the material from him more than a year ago, and I bought a small belt sander just for working it, which is still in the box out in my glass/metal studio. Guess I better find a place to put it.
Saturday, August 29, 2009
Back to Birds

After stalling out on the stilt rivet brooch, I realized that it was my attempt to change series that was bothering me. Much smarter, methinks, to do my Master's Registry projects in the series that I have well developed already. So, back to birds sitting on branches.
The requirements for the brooch are for a metal clay piece in front of a back piece made of metal, wood or plastic. Notice there's no glass option! However, I've decided to do a garden window piece, with the back piece carved from faux bone instead. That will be fun, and something I've been meaning to get back to for ages. Evidently the new design solved my reticence, since I drew it out last night and started the construction today. One dumb mistake is causing me a few frustrations, but it's getting close to popping into the kiln.
Subscribe to:
Posts (Atom)


 Posts
Posts