Showing posts with label electroforming. Show all posts

Tuesday, November 09, 2010

Electroforming

Wow! Lots of visitors coming in from Polymer Clay Daily after a kind mention of my electroforming experiments by Cynthia Tinapple. So I thought I'd show a few of my favorites and direct those interested to my Blurb electroforming book and free online electroforming tutorial, both links permanently available in the right side bar.


All these pieces are lampworked glass. The bird vessel is hollow, blown glass, with the tailfeathers attached to a tiny cork stopper. The other three are vitreous enamel reverse painted onto sheet glass, then wrapped around a base bead in the flame. All the copper electroforming is added after the beads are kiln annealed.

Thursday, December 10, 2009

Clearing Space, Reloading Etsy Shop

I've been quite remiss with listing on Etsy. Today I'm starting a campaign to clear out some of the treasures that are piled high around my studio, so that I can find the things I'm looking for!


This is the first item to make it through the photography process and get listed. It's a Retro Lovebird Pendant, similar to the one in the photo that appeared in Art Jewelry Magazine and The Glass Bead.


Check my shop as I'll be adding more items as quickly as I can get them photographed and written up.

Saturday, December 05, 2009

The Ultimate Publication: My Own Books!

For several years now, I've been saying I wanted to use the new on-line technologies to produce a book of my work. I remember the old days, when I printed out glossy photos of my quilts on my home printer, fussing and fuming, and then took the results off to be bound at a local print shop. Have things ever changed!! Now we can all have professionally printed books that look like they were mass produced, but we can order just a few...or even only one.

When my friend, Judy Perez, who is a graphic artist by original profession, announced her book of art quilts, I thought "I have to get this done!" Knowing that she was a pro and had probably really researched the technologies available and selected the best, I decided to follow her lead and use blurb. blurb makes it very easy to design your own book. Your download their software, then either use their provided layouts or make your own with text and photo boxes. The most time required was to search back through stored photo files to find originals, so I could have nice high resolution graphics.
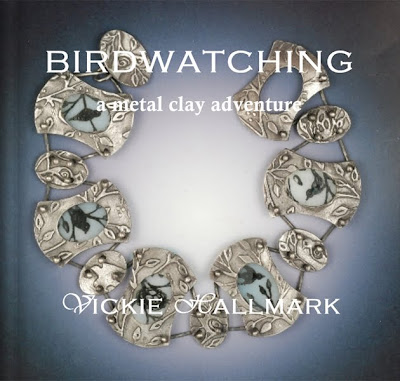

The first book I designed is Birdwatching: a metal clay adventure, which details my series of bird-themed jewelry made of silver or bronze combined with gemstones, painted glass, enamel, resin and faux bone. I decided to intersperse some selections from my collection of quotations, those that were related to birds. Then I got carried away using my bird drawings to illustrate the pages. I'm quite happy with this impromptu book and thinking perhaps I should actually PLAN a book and see where that goes.
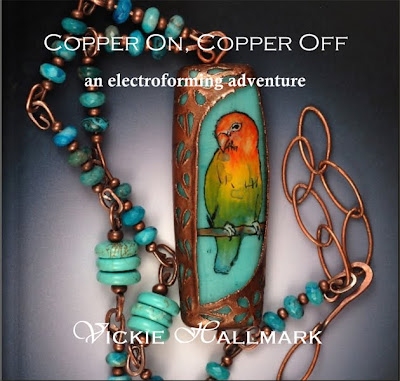

That first book was so fun and easy that I quickly started a second book titled Copper On, Copper Off: an electroforming adventure, which refines and expands upon my online electroforming tutorial, which has been extremely popular. This book has more text, as it details the background, theory, equipment, design, operation and finishing of electroformed glass beads. Extras in the book are a page of sources and a troubleshooting guide, as well as dozens of photos of my electroformed beads. I also describe my carved copper electroforming technique.

Both books can be previewed at the blurb site, where you can also order them in softback or hardback editions. I still need to do some tweaking to the cover image to be able to off the image wrap edition in the future. I purchased one copy each of the soft and hard covers to compare and proof, then made a few corrections/additions before releasing them both to the world at large.

I've ordered a stack of books for Christmas gifts this year, and I plan to offer them for sale in my classes and at the Bead & Button Show next year. And even more book ideas are percolating in my head. Can you believe that blurb offers a service to easily convert your blog archives to a book??? BlogSlurper will take your Blogger, TypePad or WordPress blog and convert it for you. Imagine the possibilities!

Monday, August 10, 2009

Patina Experiments on Mixed Silver Clay and Electroformed Copper


I'm continuing with my experiments on electroforming copper onto silver clay. Today I finished a pair of hoop earrings, complete with the high contrast patina. After finishing them, I decided that I wanted to polish the silver more and then patina again. Although the copper is very tough and suffers motorized polishing beautifully, the patina after mechanical work is different.

So, chemistry experiments are in order. Right up my alley.

Sunday, August 09, 2009

Copper Electroforming Silver Clay Earrings

Working in multiple media is a bit schizophrenic at times. As each week unfolds, I try to make the rounds from sketching and painting to glass torch to metal clay kiln to electrochemical bath. Sometimes weeks go by with my attention focused on a particular interest.


Most fascinating to me is when collisions occur. I electroform on glass all the time, but only a few weeks ago did the idea of electroforming onto silver clay pop into my vision. I've been playing with it a bit and finally have something I'm willing to show.

I've been sketching a lot of earrings. Hands down, I buy more earrings than any other jewelry, because I wear them every day. I'd love to own a pair from every artist whose work I admire. For some unknown reason, I rarely MAKE earrings. So I'm on a quest to explore this hidden aversion. What type earrings do I like? What do I buy and why? How many variations on my recent themes can I come up with for earrings? Would I buy what I make or do I need to tweak my concept? Where will electroformed earrings take me?

Oh, I get it. I'm avoiding earrings because they are a pain to photograph! They don't lie flat, it's impossible to get them both lighted the same, and I haven't come up with a great way to suspend them. THAT's why the pros get big bucks for photos.

Sunday, August 02, 2009

Studio Immersion, Final Day


Although I like to pride myself on being a quick study, learning things the hard way has its merits.

Things I've learned the hard way over my four-day studio immersion, in no particular order:

1) Carved copper must have large enough "ties" to keep the parts of the design intact unless the copper is very thick. If one of the ties breaks, the only repair that I've found that works well is to peel the copper off the bead and start over. That's a painful lesson.

2) Argentium sterling wire (or regular sterling, for that matter) cannot be embedded in silver clay and then fired at 1650° for two hours. It leaves an interesting black bubbly mess. I'd read this repeatedly, but obviously I could forget what I read. I'll be less likely to forget the visual memory.

3) I have trouble with back bends in yoga; I tend to avoid up dog. Yesterday, we did it in class repeatedly, and I followed along. As ususal, it seemed OK at the moment, but by the evening I could hardly move. Obviously, this lesson is YET to be learned: don't cave to peer pressure.

4) Art Clay Silver is not as flexible as Precious Metal Clay. My bracelet now has parts made from both clays, because I couldn't get the ACS to form over my tile molds without opening tiny cracks along the edges, even with repeated conditioning. PMC3 bends without issues. I'm unsuccessfully trying to be able to work with either clay at will. Someone have a hint?

5) Argentium sterling wire beads beautifully IF the torch flame is adjusted properly. It is possible to mess it up, though, by having the flame too low and oxidizing.

6) Micron fine polishing paper will abrade enamel off unprotected glass, duh!!!

7) When you want to make photopolymer plates in the Texas sun, the extreme drought will produce an overcast day.


8) Silvered ivory has a lovely brown crackle pattern, which sounds perfect with electroformed copper, BUT it doesn't offer a lot of contrast, especially if little of the glass is exposed, as in this Two Birds in the Bush bead.


Time to go pick up the boys from the airport. Studio immersion is over!

Friday, July 31, 2009

Studio Immersion, Day 2


Since I've started keeping a log book for my artistic activities every day, I find I get more done. I hate to look at the day's accomplishments and find a blank sheet, so I'll work very hard to do at least a little something that I can write down. Since the self accountability works so well, I've also been noting my exercise for the day and what I had for dinner in a bottom corner. I'm walking more miles and eating out less.

Usually, I note each individual step of an artistic process. If I do a part, then walk away for something else and come back later, that's worth a line. On the second day of my studio immersion, my page is overflowing.

Highlights:

1) added color to the painted tiles from day before and refired
2) made more tile boxes for bracelet, made oval links, and worked on finishing
3) fought with mandrels to release beads and cleaned holes on beads
4) painted three large beads with conductive paint, carved and electroformed them
5) peeled the copper coat off one bead with a pair of pliers after a too delicate bridge of the carved design popped and sent a wing of copper flying off the surface (does undoing count?) Of course it was my favorite, so I'm starting it again.
6) buffed and patinaed the first finished carved copper floral
7) worked on proposal for this carved electroforming class


Today, I have to send the proposals and class samples off to Bead & Button. The critic in my head is saying none will be accepted so I shouldn't bother. I'm trying to plug my fingers in my mental ears and just proceed. I find it really difficult to plan for something almost a year out. My short attention span is appalled by having to teach year old projects. Where will I be by then? Definitely further down the path.

Tuesday, July 28, 2009

Electroforming Adventures


My thoughts on gathering yesterday reminded me of the scorpion from Italy that traveled home with me.

No, not alive. After terrifying poor Rebecca in her room late at night, being sprayed with Lysol and hairspray, then relocated by a rousted-out-of-bed Gordon to the great outdoors, his poor shellacked breathing pores succumbed. Immobile, he waited the sun to be gathered into a container to cross the great ocean for an electrochemical adventure.

As a gift for Gordon at Bead & Button, I painted the poor beast with conductive paint, then electroformed a thin shell of copper over him. I didn't let it get too thick, because I wanted to retain as much detail as possible. After a dunk in liver of sulfur to remove some of the shine, he turned a wild rainbow hue (not my favorite).

He literally came out of the system and was packed on the way out the door, so I forgot the photos, but Gordon was kind enough to send me some. Thanks, Gordon! Hmmm, I wonder what a rattlesnake rattle would look like in copper?

Thursday, July 23, 2009

Perspectives Exhibit, Slide Show and Publication


Perspectives is a juried exhibit presented by ISGB as part of the Glass Art Society Conference. The collection is on display from June 5 to September 7 at the Radisson Hotel, Corning, New York.

The latest issue of The Glass Bead, the quarterly publication of the International Society of Glass Beadmakers, features the exhibit on the cover and as a full color article showing images of all the included work. One of my carved electroformed lovebirds is part of the exhibit, as shown here on page 30.

A slide show of the selected beads demonstrates the breadth of styles and techniques employed by some of the best lampworkers today.

Friday, May 29, 2009

Electroformed Bird Beads

Two more birds fresh from the electroforming bath.


I love this little hummingbird sitting patiently on her wee nest. At 2" long, this bead is almost large enough to be lifesize, at least for baby hummers!


Here's another parrot, with some funky yellow-centered white flowers in the background that really were wasted after the electroforming. You can only see hints of them here and there.


I'm finishing off a few other things, while packing to leave for the Bead and Button Show tomorrow. I may be able to leave a few blog posts to publish over the week I'm gone. We'll see how it goes!

Wednesday, May 27, 2009

Electroformed Swallowtail Bead


Electroforming on the swallowtail is now finished. I rather like how the butterfly wraps around the bead, and the caterpillar wraps around the butterfly.


It was a rather exciting day, in an unpleasant way, since I managed to spill some of the nasty chemical brew that the bead sits in while electroforming. At least I was wearing gloves, which I don't always do (bad chemist habit!!), even though they were the cheap kitchen type and obviously degraded with the acid cleanup.

Parrot Bead Electroformed


One bead through the electroforming process:


More to go today, but first must take the teen hiking/swimming for the last biology lab meeting.

Saturday, May 02, 2009

Bead Exhibitions at the Glass Art Society Conference


I'm pretty excited to announce that my bead, Fly, will be included in the International Society of Glassbeadmakers exhibit, Perspectives: Traditions and Innovations in Glass Beads, a special exhibit during the upcoming Glass Art Society conference.

The exhibit of international work was juried by Tina Oldknow, Curator of Modern Glass at the Corning Museum of Glass. What an honor to be selected!!

In the course of looking at the special exhibits at the conference, I came upon another international show of glass beads, this one invitational and curated by Diana East. The show, Tempest, looks to have some incredible work, with great photos online. All the work is inspired by Shakespeare's play.

Lauri Copeland, whose work I've long admired, has an electroformed bead in the exhibit:


My favorite, new to me, artist of the exhibit is Victoria Scholes of the UK. Aren't these beads amazing? On her website, they are strung as pendants. Wow!


I'm wishing I could head up to Corning in June.

Thursday, April 23, 2009

PISMO Bead Invitational 2009


Whoohoo!

My pieces are up on the PISMO gallery site!! Look for me at Beads -- Jewelry -- Vickie Hallmark or at Beads -- Individual -- Vickie Hallmark. I have five necklaces and five loose beads listed.


The gallery did a fabulous job! FedEx delivered the beads yesterday, and they photographed and got all ten pieces on the website in a day. And the photography is great -- the dichroic glass really sparkles! There are shots of the complete necklace, laid out painstakingly, and detail shots of the focal beads.

A girl could get to like this gallery thing!

Tuesday, April 21, 2009

Signing Electroformed Beads


A few weeks ago, the Austin metal clay group that I founded made a fun field trip to San Antonio to visit Sherry and John Fotopoulos of PMC123. Beyond the fun of making molds, shopping, and getting to know two great people, Sherry did me the incredible favor of acting as a mentor for a short discussion of my work.

One of the most important things I took away was her injunction to sign my work. I know I would never dream of putting a quilt into the world without a signature, but I've certainly sent a lot beads into the world without one.

I've worked on signature cane, because that's a preferred way to mark beads in the lampwork world. But electroformed beads get covered, so signing the copper makes more sense.

I've tried carving my logo into the copper, but its structure makes it difficult. So finally I put a diamond bit into the flexshaft and practiced signing my name on some scrap copper sheet.

Then I bit the bullet and signed and dated all the beads heading out to PISMO gallery. Some were better than others, but overall, I'd say that those years of signing quilts with an electric needle were pretty good practice for signing in copper.

Monday, April 20, 2009

More Finished Jewelry

Another of the pieces sent to PISMO, a double layer fish and sealife bead with dichroic glass and electroforming, strung with copper and silvered aqua triangle beads:


And a simple electroformed leaf pendant now available on Etsy:

Friday, April 03, 2009

Fuchsias


I LOVE fuchsias! When I lived in California in the Bay Area, I always had them. I adore the full, frilly skirts in Easter Egg pastels or wild-girl carmine and royal purple.


Alas, Texas is not fuchsia friendly. I actually saw a few lovely pots at the garden center the other day. I was tempted for about five seconds -- until I thought about having to water those pots twice a day in the 100° heat.

Painting fuchsias will have to do.

Thursday, April 02, 2009

Covered in Copper, Electroformed or Not

Thank goodness that I use a water-based copper paint for my electroforming and not the solvent-based stuff. This stuff is pricey, but worth it, I always say. I guess that means even more now.

Monday night I was working away at painting and carving new electroformed beads. I finished working on a new lovebird and decided to zip out and clean the bead release out of the cactus bead you'll see soon. Silly me just set the lid on the plastic jar of paint, thinking I'd be right back.

I'm sure you can guess what happened. I routinely shake the copper paint because it separates. So I shook it, all right. The lid and copper paint went EVERYWHERE. I was so shocked by the drenching that I dropped the rest of the jar, too. I covered the beads I was working on, much of my table, every stitch of clothing I was wearing (and not my regular jeans and tee, of course!), my shoes and a wide swath of tile floor.

Because of the price, I took the time to collect as much of the puddles as possible before starting the cleanup. Eventually I tiptoed up the stairs, trying not to leave copper footprints everywhere. I peeled out of the clothes, handed them to my husband to take directly to the new washer for an isolated wash, and hopped into the tub to scrub.


So my "lifetime supply" of copper paint is suddenly looking to have a short future. The clothes did not come completely clean. The brown leather Sketchers are partially metallic. And a bunch of beads needed repair work. What an expensive lesson!

I'm learning a lot about trouble-shooting elelectroforming, that's all I can say.


This lovebird is one of the beads that was drenched in its formative stage. Recovered, as you can see.

The carving along the edge is a bit of "innovation by necessity." I decided I wanted to stop hiding so much of the painting. So I tried making a cushion base bead and just wrapping the front side with a tile. The trick is in where to start the application. This was the first experiment, and the bird came out way to one side. Hence, the creative solution of carving down the side front.

Wednesday, April 01, 2009

Another Electroformed and Painted Enamel Bead

The fish in this bead is sandwiched between the background blue rainbow dichroic and the front layer of sea grass, ferns and snail. There's a real sense of depth -- you can see more of the fish by tilting and looking between the layers.


The electroforming has a simple surround of bubbles on the front.


There is a complementary scene of grass, fish, shells, and starfish carved into the back.


The cutouts let light into the bead, to make the dichroic sparkle, and let you peek at some of the hidden painting.


After this last multi-layer bead, I'll have some simpler single wraps with electroforming coming up. They seem so easy after these nerve-wracking beads!

Monday, March 30, 2009

More Electroforming

To balance the intensive work I've been doing, I decided to electroform some plain beads, using the new carved technique I've developed.

These are simple dichro wraps, with flower and leaf cutouts.


This is a trivial ivory bicone, carved with a long pinnate leaf on both sides.


Simple, but effective.


And one more of the simple blackbirds in a tree, with a similar scene carved into the electroforming on the back and my beaded copper edging.