Friday, October 19, 2012

Jewelry School Adventures - Hollow Forms

This week I took my seventh class at Jewelry Studies International. Vasken Tanielian demonstrated the class projects will skill and precision, and then I followed along with many mistakes and repairs.


The first project was a domed hollow band, made from two strips of 22 gauge Argentium. The outer band was made 10 mm longer, then domed over a dapping punch until the sides met the inner band. This relatively easy project only took a morning to complete. I added a texturing wheel to my wishlist to get the matte finish on the outer surface. This band will earn a bezel setting sometime in the future.


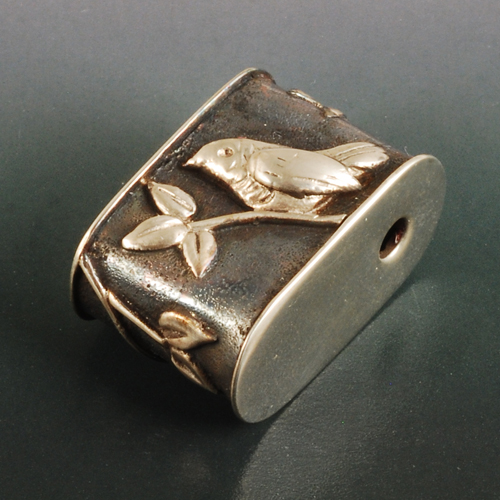
The second project was an oblong hollow bead. I went off script and used my fine silver bird and leaves in combination with the Argentium wire to make the surface designs. All were fused to the flat sheet and then the strip was formed into the oval. The gauge of metal was a bit lower than planned due to a late shipment, and even Vasken had slumping when fusing the back seam. The weight of my bird on the front made it even more problematic in my case. We all decided to solder on the sides rather than fuse, to avoid further aggravation. I really enjoyed learning to use a homemade point and a hammer handpiece to texture the background.


Next we attacked the box ring with the outer band 15mm larger than the inner. I decided to flip the large side on the outer band because this configuration looked like an egg, which fit with my bird theme. Again, soldering issues were my main problem area. I had one pinpoint area that refused to close when adding the first side. I asked Vasken to help and he soldered it. When I soldered on the second side, I still saw bubbles when I dropped it into the pickle, indicating an air leak somewhere. It turned out to be the original trouble area. After several more attempts to close the hole, to no avail, I finally soldered a small trimming of metal right over the area. So my errors provided me the opportunity to learn how to fix the issue in the future.


When it came time to make the lentil bead with patterned wire overlay, I decided to go my own way again. I fused flowers and leaves onto each dome, then soldered them each to a flat back. No holes this time! And plenty of learning about how to file and sand around the raised elements to get the edges nice and flush. The earrings are a bit heavy, and the backs don't really add anything to earrings anyway. However, I do feel more confident in my ability to handle hollow construction in the future.

Friday, October 12, 2012

Jewelry School Adentures - Chasing and Repousse

This week I spent five days at Jewelry Studies International with Ronda Coryell, studying chasing and repousse. Chasing is the process of using hammered tools to depress a sheet of metal from the front, while repousse is the same process from the back. Usually, the sheet of metal is mounted in a pot of pitch to support the work, with the back side facing up for the first pass. Repousse is used to give the general shape of the piece, moving metal down into the pitch that will be raised on the front. Then the piece is flipped to add detail via chasing from the front.


The trick is to think in reverse. Deeper is higher. Things in front must be deeper. Depth of field is created by varying the depth, so a leaf coming out of the plane of the metal protrudes more at the tip than at the base. After years of doing double sided work and carving molds for glass casting and reverse-paintings on glass, this reverse thinking is fun for me, although sometimes it takes some tweaking. It's a good version of "negative thinking."


Our first day was spent getting a feel for mounting and unmounting the metal in the pitch pot, learning how to hold tools and hammer properly, experimenting with the various tools, and exploring that negative space. After filling a 4" square of copper with a variety of marks, we were supposed to start on a flower and leaf medallion. Since I want to make jewelry rather than larger metal pieces, I started small, with a 1.5" diameter circle with a motif similar to my usual work. It didn't take me long to realize that the tools provided were too large, but Ronda rescued me with a few of her handmade collection. Working with magnification, it took me longer to complete this piece than for others to do the 3" diameter exercise. It took me a full day of work to complete the small piece.


One of the more valuable parts of the class was learning to make our own chasing tools from water-hardened tool steel. Several classmates had purchased expensive sets of chasing tools from reputable suppliers that were totally unusable as supplied. They learned to reshape and polish those tools. I made five chasing tools over several days, as I had waiting time to fill, and plan to continue with a large collection. Ronda has a caddy with probably thirty different compartments, each filled with a collection of eight sizes of a give shape or texture! What an investment!


I decided to simplify and work larger for the next project. Ronda offered to teach us how to make a cup to hold our chasing tools, which seemed like a great project, as I've never worked with anything that large. So I drew out a simple hummingbird and trumpet flowers, which turned into a much larger project. I realized after doing the repousse that I had the flowers looking very flat rather than tipped, so I had to totally rebuild them by sinking the centers dramatically and raising the front areas more. In the process I learned to trust that voice in my head that says "the metal is too hard; you need to remove it from the pitch and anneal" as I put tiny tears into those over-depressed centers. A learning process, to be sure.


After many, many hours of work, I formed the piece into a cup and soldered a large piece for the first time, making a mess of the seam to the bottom, but also learning how to deal with recalcitrant seams. Once trimmed, darkened and polished to bring out the highlights, I have some useful tools to remind me of a fantastic class. If you ever have the chance to take this class, jump at it!


Sunday, October 07, 2012

Adding Details to Necklaces

How to turn an interesting focal into a balanced necklace is a topic I'm really studying at the moment. After making the Spring Flock necklace, I wanted to make a much simpler necklace using just a single treetop panel. I added half rings on the back to attach chains after firing. 


Spring Treetop Necklace
©2012 Vickie Hallmark
sterling silver
Then I pulled out the stash of chain and started auditioning. I decided that the lighter weight chains seemed to match the delicacy of the panel best, but a single strand didn't have enough visual weight. Doubling the chain up fixed that issue, but it still seemed very plain. Finally I decided to add a collection of floating flowers to the small links along the chain, just a few on either side. What do you think?

Friday, October 05, 2012

Kathleen Sommers Trunk Show

Just sharing a few photos of my trunk show at Kathleen Sommers. It's nice to step back and see a large quantity of work all together.

Vickie Hallmark trunk show at
Kathleen Sommers October 2012

Vickie Hallmark trunk show at
Kathleen Sommers October 2012


Monday, October 01, 2012

My First Trunk Show

I've been furiously working on my very first trunk show, to be held at a fabulous boutique in San Antonio, Kathleen Sommers.  The dates are Thursday, Friday & Saturday, October 4-6. Here is the fabulous mailer image that their computer guru put together.


For the past many weeks, I've worked as often as possible on putting together a range of earrings, bracelets, and necklaces to offer. I've gone back and forth between experimenting with really new designs and reinvigorating old favorites.


On Friday I delivered the stash of goodies complete at that point, including this tray of earrings, for early entry into their computer system. This week I'm finishing up remaining projects and working on other details like some extra earring display stands. Each of my collection is different, so they are actually a craft art project of their own.


If you're in the San Antonio area, please drop by and say hello!