Last week, I returned to Jewelry Studies International for more instruction from the amazing Ronda Coryell. The class was Fabricated Model Making, to be followed next week by Advanced Casting, Wax & Mold-Making. I've been investigating the prospects for casting some of my work, and actually had sent some pieces out for mold-making and sample castings. This class gave me a much better feeling for aspects of design that I should keep in mind in the future when I make work that might be reproduced.
 |
| carved bracelet link and the open box for the box link |
For the first day of class, we dove right in to create this carved bracelet or watch link. A pierced layer of Argentium was fused to another layer, then carved into the horseshoe shape. This piece is tiny, half an inch across the widest part. A fused wire across the opening forms the hinge pin when the curled hinge under the flower is closed later. The leaves and flower made from metal clay are my personalization of the class project, which Ronda encourages. The link was soldered onto a heavy brass sprue to form the pathway for metal to flow later during the casting process. We also started construction on the box link, cutting, filing, bending and fusing the sides of the box.
 |
| box link with side links |
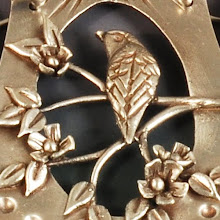
On the second day of class, we completed the box link by carving the top away to form a smooth dome, then shaping and attaching a curved roof. Again, I adorned my link with metal clay parts from home, a tiny bird with leaves and granules. The attachments for this bracelet are riveted pins through the curved side links. We learned to build a tree with the sprues. My hands were shaky and I had major issues with soldering the pieces upright to the brass, to the point of grasping one of those side links hard enough to break it when it was hot. Shattering hot Argentium is a classic problem, but until now I'd never actually had it happen to me. I quickly remade the side link and changed my soldering to laying down to avoid the wobbly hands.
 |
| watch-style clasp |
Following the box link and continuing into the third day of class, we built the hinged clasp for the carved link bracelet. This was a small watch-style clasp, with 2 mm tubing hinge knuckles. We built the two pieces entirely without solder. Again, I attempted to solder the pieces onto the brass sprue, only to flip a piece over with my clumsy hands and solder it on flat instead of on edge. Lots of unhappy moments ensued while I unsoldered it, then cleaned it all up and finally soldered it nicely onto a sprue made from leftover argentium. No more dirty brass for me, I decided.
 |
| carved link model with mold and three waxes |
By the fourth day of class we started to work with molding. We packed layers of rubber mold material around the models in aluminum frames, then put them into the vulcanizers to react under heat and pressure. After cooling, we learned to cut the molds apart with scalpels and to inject wax into the molds. We used two different types of mold material to compare. The molds look pretty ugly all hacked apart, but they give incredible detail to the finished wax. I made three of the carved link waxes to see how they would look linked together.
 |
| box link model and wax, showing shrinkage |
Ronda emphasized that the major thing to learn about in this class is shrinkage. You can see the effects in the image of the box link and its wax. This is why models are made in heavier gauge metal than desired for the final product. As a rule of thumb, we worked in 18 gauge, expecting it to shrink to 20 gauge.
 |
| curled leaf earrings model and wax |
The final project for class was a ring, but we were again encouraged to individualize our work. I asked for my class material as 18 gauge sheet and laid out a pair of wire-edged earrings with fused leaf pattern. I brought in heavy Argentium wire to build the sprue, which allowed me to fuse on the sprue and to recycle this silver in the future since there's no solder contamination.
 |
| sterling clay earrings with sprue and the resulting wax |
I did solder a pair of sterling clay earrings onto a sprue for molding. These molds were tricky to cut, as the overlapping leaves needed extra cuts to allow them to release easily.
 |
| bird and leaf tree model |
 |
| bird and leaf tree wax |
Finally, I fused a collection of tiny handmade metal clay leaves and birds to a long Argentium sprue to test casting components. It's easy to see why these structures are called trees. Unfortunately, I used 18 gauge wire for the side branches, and that didn't provide sufficient flow to get good wax impressions all the way to the tips of the branches. I'll remove the leaves and add a heavier sprue to fix this issue. Even so, I'm excited about the prospects of being able to do the exciting treetop scenes with less prep work.
 |
| JSI - Rings & Bands 101 |
I can't say enough good things about the class offerings at JSI. I love the fact that I can take a week long concentration on a topic of my choice, and now there are even shorter weekend and evening classes available. Students fly in from around the country to take classes here, and some even come for an entire semester or two. There are also exciting master workshops with visiting artists, such as an upcoming
torch firing class with Anne Havel. And don't miss out on the opportunity to win a FREE introductory class,
Rings & Bands 101, including all materials, worth $750, by entering the
scholarship contest. Hurry! The entry deadline is March 29.


