Showing posts with label Master Muses. Show all posts

Wednesday, February 09, 2011

Master Muse Project -- Enameled Earrings

I'm a bit sad to see my tenure as a Master Muse coming to an end. Today my final challenge tutorial appeared on Tonya Davidson's blog. You can see all the past Master Muse tutorial synopses (this is #48!) here.


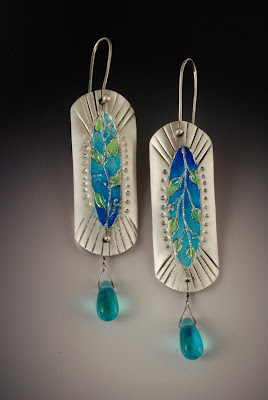
The challenge for this sixth project was to use syringe creatively. I personally like drawing with syringe clay, so I designed a pair of earrings utilizing the syringe lines to create cells for enamel. Traditionally, fine wires are shaped and attached to a metal backing in the technique of cloisonne, so this is a quick and easy way to get that look. I wet-packed the enamel into the cells, using a variety of colors to create shading and depth.

It was a fun project, despite a few frustrations. I kiln-fired the enamels, using the Paragon SC-2 that I use routinely for metal clay. I don't typically use this kiln for enamel (I have another tiny kiln that I prefer because it recovers faster), but thought I should use the one that most potential users of the tutorial would have on hand. I found that the door closure jarred the enamel powder enough to scatter it on the face of the piece. Boo, hiss! Unwanted color in the crevices. But then I went and read my copy of Pam East's Enameling on Metal Clay and found that she learned this before me. If only I'd done my research, I could have followed her recommended fix before I made the blooper.

As I tell my students, making these mistakes is the best way to ensure that I'll remember the lesson next time.

Wednesday, December 08, 2010

Master Muse Project -- Hinged Bracelet

This morning, my latest Master Muse project is up -- this traditional hinged panel bracelet.


My approach was to utilize a standard rubber carving block to create a texture block of a continuous scene for the panels. Then I used an extruder to form the borders and hinges, and pinned them together with beaded Argentium wire pins. The clasp is a friction fit pin, secured by a chain.

Originally I planned to enamel the bracelet panels, but I ran out of time. Perhaps when the bracelet returns to me I'll snip the pins and do that.

Check out the more detailed synopsis and all the other tutorials on Tonya Davidson's Master Muse site.

Wednesday, September 15, 2010

Master Muse Project -- Concrete & Pearl Earrings

My latest Master Muse project is up this morning on Tonya Davidson's blog. The challenge this round was to use concrete, specifically Whole Lotta Whimsy's version, WhimsyCrete. Because concrete is such a surprise material for jewelry, I juxtaposed it with refined mabe pearls in a pair of earrings. Yes, they are light weight!


See a synopsis of the tutorial for creating the earrings here. The full tutorial, when it is available, will have detailed instructions and show how to:

  • make an open bezel with slab construction
  • texture metal clay 
  • add on components to a bezel
  • use WhimsyCrete™
  • change the shape of a pearl
  • patina and finish a fired piece of metal clay
  • make custom ear wires
Here's a simpler variation with white pearls and colored concrete:


Wednesday, July 07, 2010

Master Muse Project -- Box with a Metal Clay Lid

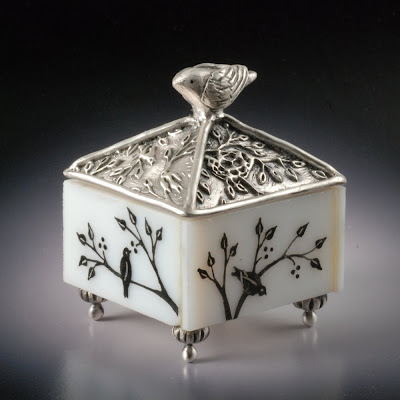
Time for project #3 for the Master Muse series. This round the challenge was to create a lid of metal clay and a coordinating box of any material. So far, Anne Mitchell and Patrik Kusek offered up clever boxes made entirely of metal clay. Barbara Becker Simon, being a lampwork artist as well as a metal clay artist, combined the two in her small vessel. I took a different approach.


I wanted to combine my hand-painted enameled glass with silver, so I constructed the box from small glass tiles such as I use in my Garden Window class. I stopped at just the black enamel, as I love the crisp black and white silhouettes with the silver. Each side has a different scene, both lid and box.


And the inside has one of my favorite quotes.

Check out the tutorial synopsis on Tonya Davidson's blog. Or visit my past tutorials on torch-fired enamel set in silver clay or an innovative clasp design. The latter is now available in the full bench format at Whole Lotta Whimsy.

Thursday, June 24, 2010

Master Muse Jealousy

At Bead & Button, when I went by to see Tonya Davidson at Whole Lotta Whimsy, we of course talked about the latest challenge, to create a metal clay lid to fit a box of an unspecified material. I had my idea all ready to go, but not worked up yet.

Imagine how my heart sank when I heard from Tonya that Barbara Becker Simon was set to turn in a glass and silver box!! Oh, yes, I'm a "me, too" gal. Since Barbara's tutorials are always amazing, I started to rethink my great idea. Should I continue with glass...or try a different material, polymer clay or even fiber? Over the past two weeks, I've done a few different tries, but finally I came back to glass.


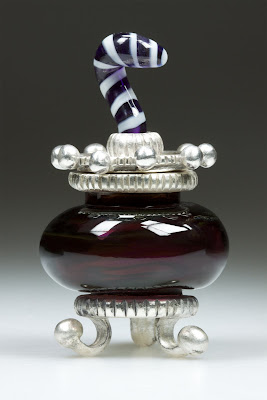
My box is nothing like Barbara's clever little vessel, made from a lampworked hollow bead with attached metal bottom and lid. Rather precious, isn't it? See the tutorial synopsis here.


Standing, no sitting, there in Tonya's booth, I also could look up and see Anne Mitchell's clever box locket, which sent me running home to read the challenge rules again. Was it a requirement for it to be wearable??? No, thank goodness, although I gave some short thought to that possibility at this prompting. But there was a requirement for using an extruder, which I'd forgotten about. Good to reread the rules before starting. See Anne's tutorial synopsis here.

My project is heading out late today or tomorrow, so I'm feeling that satisfied sense of having managed the myriad problems that arose in its creation. Maybe I'll take a day or two to just admire it, before I start on the next project. You, on the other hand, have to wait three more weeks to see it. Just call me a tease.

But meanwhile, Angela Baduel-Crispin and Patrik Kusek will present their own versions. Thank goodness I won't have to have heart palpitations when I see theirs. Mine will be done and gone, past agonizing over. Watch for the tutorials every Wednesday on Tonya's blog.

Monday, June 21, 2010

Master Musing

I'm busily working on my third Master Muse tutorial. I find these projects to be worthwhile because they prompt me to take on challenges that I would otherwise probably not attempt. True, there are always those ideas that sound interesting. I'd like to try that material/technique/tool...someday. Well, for some of those techniques or materials or tools, the someday bumps up much sooner because of the Master Muse challenges.


One of the things that drew me to science as a career was the problem solving involved. Scientists are inherently people who like offroading without a map. The whole process is so akin to art:

  1. Come up with an intriguing idea.
  2. Set up the experiment (in science that part often takes much longer).
  3. Analyze what did and didn't work.
  4. Set up the next variation of the experiment.
  5. Repeat until the question is answered or the question changes.

So it's no surprise that my experiments for the Master Muse challenges always seem to involve multiple iterations. I'm never satisfied after the first experiment. I always have a hitch or two. I'm moseying along nicely, taking photos of every step of the process and writing up exactly what I did, when something goes amiss. Oops, back up and change the last five steps. Continue on. Aha! Brainstorm! It would be so much better/easier/faster if I'd just done it this other way. Second version ensues. Rats! That doesn't look the way I envisioned it. Punt. Sleep on it. Get a snack. Pace (wheel) around the house, procrastinating. Deadline approaches; must do something. Third version finally works, visually and technically.

So far it seems the third variation is truly the charm. The photo is a hint of variation one, aborted.

Tuesday, June 01, 2010

First Master Muse Tutorials Available!

It's official -- the first set of Master Muse Tutorials are now available from Whole Lotta Whimsy. I'm so thrilled to be in the first set. See -- there is good karma in volunteering to go early with deadlines. All the available tutorials are from the first challenge of innovative clasps.


My tutorial teaches every step to recreate my jeweled ball and slot clasp bracelet, including making molds from polymer, making templates, creating embeddable connectors, balling wire, making a hollow form, adding a fine silver bezel cup, andsetting a cabochon into that cup.


Patrik Kusek's peekaboo clasp offers a wide range of skills, including making custom textures, making domed beads, embedding custom connectors, making a hinge enclosure, extruding tubing, and applying 22K Aura gold.


Barbara Becker Simon's spiral clasp in CopprClay details working with patterns, using CopprClay, carving clay, incorporating connectors and wire, flush setting a stone, and even stringing.

Every tutorial includes copious photos to illustrate the step by step directions, from concept to finishing. The tutorials are printed on heavy duty cardstock with a UV resistant coating, perfect for your bench. Think of them like an inexpensive version of a class with each artist. No travel required!

Wednesday, April 14, 2010

Freak Accidents


So I've vanished from the planet, unless you saw my two short FB posts.

What has happened is a freak accident. I went for my regular morning walk with DH. I took a bad step on the back part of the neighborhood loop, and inverted the knee hard enough to snap the tibial plateau. Then I fell, cracking the orbit of my left eye and fracturing the right wrist.

After surgery by the central Texas specialists in such trauma, I've spent several days in the trauma hospital, weaning off morphine. Now, I've transferred to a rehab hospital, where I'll learn the skills I'll need to go home.
Already I've learned to push myself one-handed in a wheelchair and how to dress myself. Very tight schedule here, and not my usual aides, so blogging is short-changed. Read about my enamel project on the Master Muse blog.

Thursday, March 18, 2010

Master Muses Tutorials

I've been remiss (with good reason, but even so) about posting links to my fellow metal clay Master Muses. The last time I wrote about the clasp designs of the two artists who preceded me in the sequence, Anne Mitchell and Barbara Becker Simon. Since then, five more talented Muses have presented designs, two more clasps and three steampunk stenciling projects.


Angela Baduel-Crispin took a focal approach to her version of a keyhole clasp. Elegant and streamlined is her usual style, and this piece follows suit. Techniques covered in the tutorial include engineering a key and slot mechanism, building a bezel setting for a stone, and embedding wire connectors.


Patrik Kusek served up an intricate custom clasp with a hinge catch. As if that weren't enough, he included constructing half-lentils with embedded connectors, making custom textures from found objects, and using keum boo to add a flash of 22K gold.


Ruth Baillie maintained her whimsical point of view, even with a steampunk assignment. After cutting a brass stencil, she used spackling and watch parts to create an imaginary hot air balloon car. Her tutorial includes inspiration about designing in layers, stenciling with thick slip, accommodating shrinkage, piercing and sawing brass stencils, spackling with metal clay slip, and riveting attachments.


Kelly Russell infused her steampunk bead with a luscious dose of color, one of her trademarks. Her tutorial includes expertise in composing with layers, texturing with thick slip and a palette knife, planning for shrinkage, preparing a stencil, sizing sidewalls and posts for perfect beads, and achieving that incredible patina.


This week, Lora Hart unveiled a fabulous articulated pendant based on a periscope. Incorporating steampunk elements, it nevertheless maintains her baroque sensibilities. She reveals the details of building with articulated parts, using polymer clay molds and armatures, texturing with thick slip and a palette knife, planning for shrinkage, using PMC sheet to apply textures, forming simple cold connections, and finishing with a found object.

Go check out the short versions of the tutorials that will be available soon from Whole Lotta Whimsy, and check back next week to see what the Whistle Lady, Donna Penoyer, has dreamed up.

Sunday, February 14, 2010

Silver Clay Keyhole Clasp # 2 -- Strung as a Bracelet

I dug out some beads to coordinate with the amethyst CZ -- boulder opals, Czech glass, sterling nuggets and freshwater pearls. Still debating if I need to tweak this design a touch.

Saturday, February 13, 2010

Silver Clay Keyhole Clasp # 3 -- Strung as a Bracelet

After a bit of digging through my collection, I did find some yellow beads to coordinate with the yellow diamond CZ. Most were flashed with blue and green iridescent coatings, so I added more aqua to the mix.

Friday, February 12, 2010

Silver Clay Keyhole Clasp -- Three Variations

There were two main themes in my ideas for variations on metal clay keyhole clasps: shape and decoration, both stones and metal.


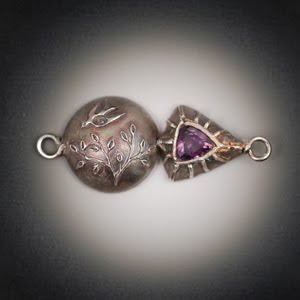
This is the clasp from the tutorial: triangular hollow clasp with a sapphire bezel-set cabochon insert.


I've experimented with using different molds, including a standard doming mold, to form the pieces. There are problems when working with these standard shapes, as the height of the hollow is very shallow near the edge where the ball insert must rest when the clasp is closed. A handmade polymer clay mold designed with a high wall on that edge is much easier in the long run.


My drawer full of colorful stones led me to explore ideas with setting faceted cubic circonia (CZ), which is a bit trickier than the simple bezel set cabochon on the tutorial clasp. Perseverance and patience are required to get the stone set in a pleasing manner (and even then getting it perfectly centered is almost impossible!). I have not been overly drawn to stones in the past, so I haven't developed my skill in this area to my personal requirements. More practice needed!

All I can say is I am becoming better friends with my syringe, to the point of doing the ring of leaves decoration surrounding the yellow CZ by syringe. Not too bad, unless you are clumsy and put your fat finger somewhere it doesn't belong. I hate to admit I repeatedly blundered. Years of stringer practice with glass has improved my ability to design and control the syringe work, which is all for naught when the whole piece is bobbled. Luckily I don't stick my fingers into hot glass, but that's probably because I can hold and turn a glass bead easily on its mandrel. It makes me wonder about solutions to holding the metal piece more securely, with my fingers further away from delicate wet clay.

Wednesday, February 10, 2010

Master Muse Project -- Innovative Metal Clay Clasp

Today is the day -- my first Master Muse project for Whole Lotta Whimsy is posted on Tonya Davidson's blog! It was an exciting morning to wake up and see how my seventy photos and eleven pages of text would be trimmed down to a synopsis of nine photos and seven steps. For those inventive souls (like me) who can usually figure out how to make a project just from a few hints, this one might be a big challenge.


As I mentioned several weeks ago, this clasp took me three iterations to get to a design that worked technically and aesthetically for me. I started with the inspiration of a ball chain connector, where a ball slides into a slot. Now I know that's called a keyhole clasp. During the course of my experiments, I learned several new tricks that I will employ extensively in the future, including my favorite clever (if I do say so myself) jump ring and ball inserts.

This is also the first announcement of my new textures available exclusively from Whole Lotta Whimsy next month! This first texture, titled Flock, is a large 4" square texture with tree branches, a nest, and many birds in various poses. I use this texture regularly for much of my recent work.


The tutorial also will be available in March in its full form, in a handy laminated bench-ready edition. Consider purchasing it to learn my approach on the following topics:


  1. making and using molds
  2. using my textures
  3. keyhole clasps
  4. 3D construction
  5. jump ring and ball connectors
  6. embedding bezel cups
  7. setting cabochons
  8. finishing, including patina and stringing

In the next few days, I'll finally be able to share more examples of variations on this clasp design and details about my trials and tribulations in developing it.

Wednesday, February 03, 2010

Master Muses Tutorials

Tonya Davidson is posting synopses of the Whole Lotta Whimsy Master Muse tutorials on her website. The full length tutorials will be available for purchase beginning in March, with every detail of the design and finishing carefully described and photographed.

Five projects in a row will explore a given theme, with the current inaugural project being to design an innovative clasp. The assignment to the first five Muses was to develop something new and exciting, NOT a toggle or C clasp, which are over used in the metal clay community. Materials were supplied, our choice of silver or copper clay for this project, and we were given a month to get the design developed and to write the step-by-step tutorial with photos of every step. Intermediate to advanced tutorials were requested, so these won't be rehashes of beginner's techniques.


The first two tutorials have posted, with the newest launching just this morning. Anne Mitchell led off with a trendy steampunk-inspired hook and eye clasp tutorial. Technical skills included in the tutorial include designing templates, using a hole punch, riveting, and hammer texturing and shaping.

And Barbara Becker Simon's new tutorial shows a CopprClay spiral clasp, used as the focal of a necklace. Barbara's innovative technical skills encompass combining wire with clay, carving, setting stones with a setting bur, and applying gorgeous color (with Prismacolor pencils perhaps?? gotta see that tutorial!).


I'm excited that my tutorial will post next week. It was a lot of fun and some stress to execute this project. First, I knew that the level of work would be extraordinary, so I'd have to ramp up my self-expectations to turn out something I was happy with. Two, with the holidays intervening, development time was a bit short. Three, I'd never tried an "innovative" clasp, but only the more standard ideas. I was starting from scratch, whereas Barbara even teaches an entire class on clasps, so she has this all figured out. No wonder she turned hers in first!

I'm happy to say that the challenge was a great thing for me. I wasn't happy with the first iteration, nor the second, but the third made me proud. There are variations now scattered across my work table, and as soon as the tutorial posts next week, I'll be showing more of them. And I'll be detailing my development trials and learning experiences. We all know how easy the teacher makes it look when we take a class -- the project goes together like a charm! It's easy to overlook all the work that went into developing those ideas. Truly, it's that process rather than the finished product that pushes one upwards.

Wednesday, January 27, 2010

Whole Lotta Whimsy Master Muses

It's official -- the 2010 Whole Lotta Whimsy Design Team has been announced, and I'm an inaugural member!


Starting today, each of the ten artist members will take turns presenting tips, techniques and projects involving metal clay jewelry. Tune in each Wednesday on Tonya Davidson's blog to see the latest inspiration.

Drawn from our responses to a particular material, design or technical challenge, five different artists will present their interpretations over the course of five consecutive weeks. Then the challenge shifts for another five artists. Each of us will prepare six tutorials, for total collection of sixty. An abbreviated tutorial for each project will be posted free on the blog, and a complete, detailed tutorial can be purchased a few weeks later.

And to pique your interest, here's the rotation of the first five artists to watch for:

Anne Mitchell -- chain maille, fused silver and Viking knit teacher extraordinaire

Barbara Becker Simon -- renowned for her lampworked beads and silver clay innovations, Saul Bell Design Award winner, and author of one of my favorite metal clay books, "Metal Clay Beads"

Vickie Hallmark -- that's me! Number three. I can't believe I get to call myself a Master Muse next to these icons of the field. Pinch me; I'm dreaming!

Patrik Kusek -- another Saul Bell Design Award winner, known for his breathtaking nature-inspired metal clay jewelry incorporating natural stones

Angela Baduel-Crispin -- international designer of sophisticated, contemporary jewelry and a finalist for the Saul Bell Design Award this year

I'm not certain of the order of the second group of five artists, but it's an illustrious group:

Lora Hart -- super-talented designer of stunning metal clay jewelry with a Baroque sensibility

Donna Penoyer -- stiltwalking designer with a penchant for story-telling and humor in her amazing creations, including whistle jewelry

Kelly Russell -- creator of magnificent mixed media beads and jewelry with the feel of archeological relics

Ruth Baillie -- vineyard owner, bird-lover and creator of whimsical bird-themed jewelry

Tonya Davidson -- pioneer in metal clay, co-owner of Whole Lotta Whimsy, and founder of the Master Muses

Please join us for an inspirational year, starting today!