Showing posts with label jewelry school. Show all posts

Monday, April 01, 2013

Jewelry School Adventures - Casting

Last week I took Advanced Casting, Wax & Mold Making at Jewelry Studies International. I feel it's important that I really understand the process of production as I consider whether to have some of my more popular jewelry items produced.

lathe turned wax bezel and ring, with added wax leaves


carved wax dome ring
We jumped right into wax carving, which I explored in depth in January with my workshop with master wax carver, Kate Wolf. I made three different rings. First, we made a hand-carved dome ring (very 70s) to learn layout for good symmetry. Then we carved a tapered shank and added a dipped bezel, shown in the tree image below. Finally, we used the flex shaft as a lathe to turn both a ring and a bezel, shown above. I enjoyed adding my molded leaves on either side of the bezels.

dipped wax bezels
I was captivated by the ease of making wax bezels by dipping the punch from a bezel forming set (round, oval, square or triangle) into a cup of warm wax, then cutting and filing. Much easier than fabricating such a tapered bezel!

wax tree ready to invest
Building a tree by spruing wax molds is tedious but simple. The hardest part is never touching the hot wax pen to an already attached wax.

Argentium casting grain
After determining the amount of metal needed, we mixed, poured, and vacuumed the investments, then popped them into the kiln overnight to melt out the waxes. Class materials included enough casting grain for one tree, but I produced four over the course of the week. So I split my casting grain between the first two and used scrap to make up the balance. For the final two castings, I used all scrap, and couldn't tell the difference in any way. All cast beautifully.

casting tree washed, pickled & tumbled, ready to saw
Argentium is amazing in that it requires no flux during casting, and comes out completely free of firescale. It darkens during the water gun cleanup to remove investment, but vinegar and salt pickle returns it to its white beauty. A quick run through the magnetic tumbler and it looks gorgeous. SO easy! Then comes the painful sawing and filing to clean up each tiny piece.

bird decorated box links and connectors, filing needed
carved links with flowers and leaves, filing needed
I made a collection of box links and the carved horseshoe shaped links although maybe still not enough for a full bracelet in either case. These were the fabrication projects from the previous class.

tapered shank and bezel ring, with added leaves
This is the tapered ring, ready to cut a seat for a stone.

components
I took the opportunity to experiment with making a variety of components to use in my work: birds, leaves, flowers. The earrings on the left are molded from my sterling clay earrings, with the asymmetric bezels (shrinkage issues) cut off, so I can add perfect tubing bezels.

bird component models
Finally, I molded sets of my birds to cast them in multiples. Now I have to digest the material from class and decide how to incorporate the new knowledge into my own work.


Tuesday, March 19, 2013

Jewelry School Adventures - Making Models & Molds

Last week, I returned to Jewelry Studies International for more instruction from the amazing Ronda Coryell.  The class was Fabricated Model Making, to be followed next week by Advanced Casting, Wax & Mold-Making. I've been investigating the prospects for casting some of my work, and actually had sent some pieces out for mold-making and sample castings. This class gave me a much better feeling for aspects of design that I should keep in mind in the future when I make work that might be reproduced.

carved bracelet link and the open box for the box link
For the first day of class, we dove right in to create this carved bracelet or watch link. A pierced layer of Argentium was fused to another layer, then carved into the horseshoe shape. This piece is tiny, half an inch across the widest part. A fused wire across the opening forms the hinge pin when the curled hinge under the flower is closed later. The leaves and flower made from metal clay are my personalization of the class project, which Ronda encourages. The link was soldered onto a heavy brass sprue to form the pathway for metal to flow later during the casting process. We also started construction on the box link, cutting, filing, bending and fusing the sides of the box.
box link with side links
On the second day of class, we completed the box link by carving the top away to form a smooth dome, then shaping and attaching a curved roof. Again, I adorned my link with metal clay parts from home, a tiny bird with leaves and granules. The attachments for this bracelet are riveted pins through the curved side links. We learned to build a tree with the sprues.  My hands were shaky and I had major issues with soldering the pieces upright to the brass, to the point of grasping one of those side links hard enough to break it when it was hot. Shattering hot Argentium is a classic problem, but until now I'd never actually had it happen to me. I quickly remade the side link and changed my soldering to laying down to avoid the wobbly hands.

watch-style clasp
Following the box link and continuing into the third day of class, we built the hinged clasp for the carved link bracelet. This was a small watch-style clasp, with 2 mm tubing hinge knuckles. We built the two pieces entirely without solder. Again, I attempted to solder the pieces onto the brass sprue, only to flip a piece over with my clumsy hands and solder it on flat instead of on edge. Lots of unhappy moments ensued while I unsoldered it, then cleaned it all up and finally soldered it nicely onto a sprue made from leftover argentium. No more dirty brass for me, I decided.

carved link model with mold and three waxes
By the fourth day of class we started to work with molding. We packed layers of rubber mold material around the models in aluminum frames, then put them into the vulcanizers to react under heat and pressure. After cooling, we learned to cut the molds apart with scalpels and to inject wax into the molds. We used two different types of mold material to compare. The molds look pretty ugly all hacked apart, but they give incredible detail to the finished wax. I made three of the carved link waxes to see how they would look linked together.

box link model and wax, showing shrinkage
Ronda emphasized that the major thing to learn about in this class is shrinkage. You can see the effects in the image of the box link and its wax. This is why models are made in heavier gauge metal than desired for the final product. As a rule of thumb, we worked in 18 gauge, expecting it to shrink to 20 gauge.
curled leaf earrings model and wax
The final project for class was a ring, but we were again encouraged to individualize our work. I asked for my class material as 18 gauge sheet and laid out a pair of wire-edged earrings with fused leaf pattern. I brought in heavy Argentium wire to build the sprue,  which allowed me to fuse on the sprue and to recycle this silver in the future since there's no solder contamination.
sterling clay earrings with sprue and the resulting wax

I did solder a pair of sterling clay earrings onto a sprue for molding. These molds were tricky to cut, as the overlapping leaves needed extra cuts to allow them to release easily. 

bird and leaf tree model

bird and leaf tree wax
Finally, I fused a collection of tiny handmade metal clay leaves and birds to a long Argentium sprue to test casting components. It's easy to see why these structures are called trees. Unfortunately, I used 18 gauge wire for the side branches, and that didn't provide sufficient flow to get good wax impressions all the way to the tips of the branches. I'll remove the leaves and add a heavier sprue to fix this issue. Even so, I'm excited about the prospects of being able to do the exciting treetop scenes with less prep work.

JSI - Rings & Bands 101
I can't say enough good things about the class offerings at JSI. I love the fact that I can take a week long concentration on a topic of my choice, and now there are even shorter weekend and evening classes available. Students fly in from around the country to take classes here, and some even come for an entire semester or two. There are also exciting master workshops with visiting artists, such as an upcoming torch firing class with Anne Havel. And don't miss out on the opportunity to win a FREE introductory class, Rings & Bands 101, including all materials, worth $750, by entering the scholarship contest. Hurry! The entry deadline is March 29. 

Wednesday, January 16, 2013

Jewelry School Adventures - Wax Carving

Last year when I first learned of the existence of Jewelry Studies International in my own hometown, I was dismayed to find that I'd missed Kate Wolf visiting to teach wax carving. So I resolved to take the class when she returned this year. Last week I finally got to take a workshop with this master wax carver.


Our first project was learning to get the feel of the wax while simultaneously creating a matched mirror set of simple hearts. Kate is an innovator, and most of the equipment and techniques that we used were invented by her to solve various technical issues. I first carved wax in an introductory jewelry class with Claire Holliday a decade ago. The green, blue, and purple waxes we used then are still available, but so are these gold colored forms that look much more like metal.


Next we moved to carving a bezel to fit a pear shaped stone. I removed some of the bezel wall, but haven't yet completed the carving and hollowing out. Time to get out the carvers and get to work.


Both the hearts and bezel started out as a solid block of wax like this one, where I've started working on a bezel for a long pear stone.


A few days into the course, we were finally let loose on the lathe. Our flex shafts mounted into collars to spin sections of wax rods, which we then tooled by hand with gravers. I went wild and cut many different bezels and rings.


We also learned to attach the bezels to the rings.


And to add decorations via relief wax and carving.


Finally, we learned to do complicated layout for an asymmetric ring to be carved by hand. We didn't have time to do all the work ourselves, but we saw one completed in class.


Kate is a fabulous instructor - patient, innovative, funny and encouraging. If you have a chance to study with her, I highly recommend it. However, prepare for the tool-ordering frenzy on the last day. You won't know how you lived before Wicked Sticky, color coded carving tools, a belt sander for your flex shaft, and a zillion other treasures.


Sunday, June 03, 2012

Jewelry School Adventures - Heavy Bezels

The topic of the week at Jewelry Studies International was heavy bezels. This was my first class with Vasken Tanielian, who is a Paris-trained master jeweler and CAD/CAM specialist. I aspire to someday incorporate beautiful high end stones into my work, so the idea of learning to construct bezels with precision appealed to me. Over the course of the week we learned mathematical approaches to both straight and tapered wall bezels in three stone shapes: round, oval and square. Only the straight wall bezels were finished in this class, while the tapered bezels are destined for rings in the shanks and bands class next week. I have decided to postpone that class until fall, as I'm falling quite behind on other commitments and I really have to catch up.

finished heavy bezels in Argentium silver
We learned a great deal about precision this week. Precise layout was emphasized; cutting and filing were refined; tight controlled fusing and soldering were practiced. We explored the pros and cons of fusing and soldering, with lack of perfect control in fusing sometimes causing shrinkage or deformation, whereas soldering introduces harder areas that will subsequently need to be machined away with more difficulty. We learned to file almost completely through the metal to get crisp folded edges. And I learned that improperly applied force can snap one of those paper thin edges, making my first attempt at the most complex tapered square bezel destined for recycling after my attempt to repair the break with solder was not pretty.

bezel rejects, destined for recycling
I also split the fused seam on a tapered oval bezel while forming it in the bezel block. After I formed a wedge to insert and fuse to fill the gap, filed and sanded it flush, I proceeded to split it yet again. Another bezel destined for recycling, and a replacement treated more gently with interim annealing. Then there was the delicate gallery wire wrap made to fit the round bezel on the first day, somewhat overheated during fusing, then warped even further during an instructor demo on how to tighten it to fit after matching the pattern perfectly left the ring a tiny bit too large. Another piece of silver destined to be melted down. And I remade the straight wall oval as well, due to filing the bowed outside so much on one side that the wall thickness was noticeably different between the two sides.

tapered bezels, fused Argentium,
for rings in a subsequent class
We spent hours cutting square and oval seats with a round setting bur, learning to use a graver to cut the sharp corners in the square and trim the edge over the stone, and experimenting with setting stones via punch and hammer or hammer hand piece for the flex shaft.

Tapered square bezel layout
On Friday, although I laid out my tapered square bezel to remake, I decided to work on a new piece of my own. The other bezel can wait until I return for the shanks class next fall. Instead I used a small piece of tubing from last week to make quick and easy tube settings for small stones for a brooch. I'm doing a version of the cloud brooch in Argentium, with only the bird and leaves in metal clay. At the end of the day, we learned some finishing tricks that were invaluable -- how to fix those inevitable deep scratches or pits that show up despite careful handling.

Sunday, May 27, 2012

Another Jewelry School Project

I left out one of the week's projects, perhaps the most detailed. We formed this bead-bar hook-&-eye clasp from large jump rings for the bars, with added small jump rings and granulation for decoration and reinforcement. From this project I learned the pros and cons of fusing and soldering. Too much heat causes the Argentium to roughen. On such an intricate piece, the roughness is impossible to completely sand and polish out. Soldering requires much less heat, so avoids the roughening issue. My tendency is to want to fuse everything and avoid soldering, but I finally realize that I must embrace both.

Argentium bead-bar hook-&-eye clasp

Saturday, May 26, 2012

Jewelry School Adventures - Chains & Clasps

The topic of this week's class was simple clasps and chain. First we learned to make jump rings in various ways, including sawing wire coils and using a jump ring maker. We fused a batch of the smaller rings and squashed them gently into ovals. Then we assembled the chain with heavier round links that were soldered. We added a heavy ring and toggle bar with ball ends, both with soldered jump rings.

Argentium chain link bracelet
double oval fused links alternating with single round soldered links

Afterwards, we moved on to forming wire into a simple S clasp and pendant enhancer, both in heavy 14 gauge wire which made them more difficult to form than my usual lighter weight experience. I particularly enjoyed the interlocking C ring clasp, which was actually quick and easy to make once you know the trick.

Argentium S hook, pendant enhancer &
interlocking C-ring clasp
Finally, we spent quite a bit of time learning to form tubing from sheet. The initial forming is simple, as is the drawing through successfully smaller holes in the draw plate.  The key, as with many things, is having the correct tools. I have two different rounds of tubing shown here. The two pieces on the left were cut from a tube made from heavier sheet, fused together for applications requiring seamless tubing. The two pieces on the right were from a run started with lighter weight sheet, with the seam left open for applications such as hinges where that fusing step isn't necessary. I did the second round as part of my extra time on Friday, to be used as the hinge tube for the pin mechanism on the brooch I made in the sawing class.

drawn Argentium tubing
A piece of the class tubing was converted into this tiny bayonet clasp for a necklace. A top and bottom were fused onto the tube (with a hole in one end), while the jump rings were soldered on. The bayonet itself is made by sawing a section of 12 gauge wire in half -- definitely a challenge! I soldered on the tiny ball to the end of the bayonet after I melted it while trying to solder on the jump ring. This week's class was definitely good for learning to fuse and solder small, delicate parts. I'm feeling much more confident in my fusing and soldering skills now.

Argentium bayonet clasp made from
drawn tubing and split wire


Saturday, May 19, 2012

Jewelry School Adventures - Earrings

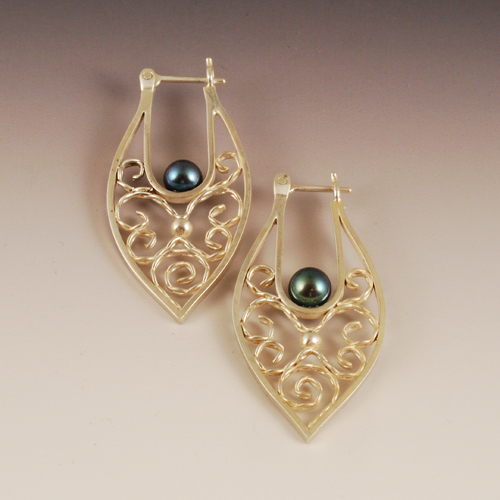
The final project of the Earrings class involved filagree and making tiny mechanisms. First we flattened square wire into rectangular wire, then cut, formed and fused it into the perimeter of the earrings. Then we twisted and flattened the filagree wire to cut & form into the delicate pattern. Once that was all wedged into place with just the right amount of tension, we fused it all in place. My slightly different design included the silver balls which were placed after the wires were secure.

argentium fused filagree earrings
with soldered mechanism from sheet & wire

The earring mechanism was the tricky part. We formed sheet and wire into the tiny riveted post and spring
clasp, both soldered onto the top of the earrings. Finally, we glued pearls onto a soldered post in the center.

Wednesday, May 16, 2012

Jewelry School Adventures - Earrings

This week's class is Earrings, Mechanisms & Granulation. We have twice as many students, attesting to the popularity of earrings. On the first day, we made two pair. First up, twisted square wire hoops. Argentium is so malleable that it twists easily and beautifully. If you have an area that didn't twist the same as the rest, you just anneal the part you want to twist more, leaving the rest hardened, then correct the problem. Mine twisted perfectly the first time. The we cut 3/4 rings, melted some large balls and fused them onto one end of the rings. After that, we made tiny jump rings and soldered posts into the jump rings for extra support on the business end of the hoop.

twisted square wire earrings
fused & soldered Argentium sterling silver
On the same day, we learned to deliberately slump Argentium to give "torch formed" leaf earrings. First the wires are shaped and laid on the sheet, then fused to attach. The sheet is flipped over and the temperature of the metal is raised until the silver begins to slump around the wires. The photo shows the front (right) and back of the earrings.
fused and slumped earrings
Argentium sterling silver
The next day we started a complex pair of earrings involving granulation and bezel set stones. I drew my own design to be different, then spent a lot of time bending wire to fit and tack fusing the pieces together in the desired shapes. Eventually I got it all fused down onto the sheet and started forming bezels by fusing heavy, 24 gauge strip into ovals. I formed what seemed like an army of granules by cutting uniform lengths of wire and balling them on a charcoal block, then carefully set them into their places. For the last thing of the day, I fused it all down.
granulated Argentium sterling silver
bezel set onyx
This morning, I cut out the center and surrounding metal, filed and sanded, and began the process of stone setting. While I have set thin-walled bezels before, I've never had to move this much metal. i tried it two different ways, with a hammer and punch and with a hammer hand piece on the flex shaft. Now I know what I want for my birthday! Then I tried to learn to use a graver to "bright cut" the top of the bezels, but I definitely need practice at that. After I sanded and polished the bezels, I formed a small pair of plain round wire hoops to hold the dangles. I wish I'd given more thought to making these in keeping with my usual style, because they don't really appeal to me, but I think I'll have time for that on Friday.

Tomorrow, we start filagree!

Saturday, May 12, 2012

Jewelry School Adventures - Flush Setting & Sweat Soldering

As the week has progressed, my sawing skills have improved dramatically. The instructor and the three students all had a good laugh at the planning that suggested only three saw blades per person for the week. Even Ronda went through at least a dozen. We started out with 3/0 blades and worked progressively finer as we attempted more complex cuts.

Saw-piercing practice
The fine inside curls in this pierced piece were cut with 8/0 blades, so fine and delicate that I literally broke one when I blew silver dust off my piece mid-cut.


Along with sawing, we learned roller printing and flush stone setting. I admit to flunking stone setting on the first day, which just made me more determined to get the hang of it. On the second day, I set the same ten 2mm CZs over and over again.  I could still use some practice, as in my final piece, the setting bur took off on me and cut the center hole too deep. I also still sometimes slip with the burnisher and put a scratch into the pre-finished front.

bird brooch sketch
For the final project, I deviated from the assignment to make something more my personal style. Here's the sketch that the instructor approved from a selection I drew with constrains of a 1.25" square of silver.

fused argentium & 22k gold with flush mount CZs

Then I deviated again, as I felt I'd prefer to practice fusing Argentium rather than sweat soldering. The assignment was to learn to work with thin widths of metal overlay, to fuse on 18K gold granules and to set stones. No solder was used for this construction so far, although I may solder on the pin mechanism.

I can officially say that I got what I came for after two weeks of class. My vision was to make my window pieces out of argentium with the bird & branch made of metal clay fused on top. Can do. Next week's class is Earrings, Mechanisms, and Granulation.

Wednesday, May 09, 2012

Jewelry School Adventures - Sawing

I am continuing with another class at Jewelry Studies International. The topic of the week is Sawing & Setting. While I've got beginner sawing skills, I thought a week of intensive practice would be just the ticket to confidence to tackle any idea I might conceive.


The first day of sawing involved several practice pieces, first in copper and then in brass. We learned to mark patterns by gluing on a paper template, transferring the toner image via acetone, and scribing for precision. We also learned to cut and file edges to make a woven illusion.


Many hours of sawing later, my poor left arm (the holding side) was complaining, but I was improving. A major transition occurred when I reversed the direction that I cut from clockwise to counterclockwise.


On the second day, we graduated to Argentium sterling, which cuts like butter. The tiny piercings in these Celtic knot work earrings are so small that it's almost impossible to file, so the objective was to cut so cleanly with the 6/0 blade that clean up would be unnecessary. Failing that, we used the saw blade itself to file the inside edges. Then we roller printed copper for a background piece, and I went my own direction rather than cut the plain triangular pieces. I now understand why I should buy highest quality saw blades by the gross!


Saturday, May 05, 2012

Jewelry School Adventures - Fancy Rings

After finishing up one week at Jewelry Studies International, my head is spinning with ideas. On the fourth day, we finished up the flared ring and started another. Although I originally sized my outer ring so that it was free to spin, I decided that I really didn't like it (perhaps it moved too much). So I stretched the flared band out enough to tighten against the outer ring and lock it into place, which was the original design anyway (did you know that spinner rings are patented?). The protected part of the flared band has a deep black patina, while the edge, outer ring, and inside all have a bright, burnished polish.

flared capture ring and band with fused jump rings and granulations

The final project of the rings class was a complex fused jump ring and granulation project, which required more finesse than I yet have to get the rings all perfectly shaped and spaced.

granulation ring
Since we had a final day for finishing and our own projects, I decided to tackle the jump rings again, but forgot the sequence in my quest to prove that I could get a ring formed and fused in record time. So I took it as a design opportunity to make a different ring, with two wire outer rings capturing a single row of granules (all hand made, by the way, not purchased).

file silver clay bird fused to Argentium ring shank
Finally, part of the reason I have undertaken these classes is to explore the possibilities of combining fabricated parts made from Argentium with metal clay components. One evening after class, I sculpted a small flying bird in fine silver. I squared my double round wire ring and cut a corresponding double trench in the back of the bird with a ball bur. Ronda tacked it into position with the laser welder to avoid a balancing issue, and I fused the two together. SO EASY! That's why my head is spinning with ideas. Many of these rings are destined for future combination with metal clay. I'll be experimenting with fusing sterling clay with Argentium, as well as with embedding Argentium components into clay and then carbon firing. So many possibilities await.