Showing posts with label enamel. Show all posts

Saturday, February 25, 2012

Weekend Artist Retreat

The fabulous Lora Hart & Lorena Angulo traveled to Austin this weekend to play in my studio. Today's project was torch firing enamels. We dapped copper disks, coated with a white base coat, then outlined in black & finally filled in watercolor with a brush, with firings between each step. This is my demo sample.

Torch-fired enamel by Vickie Hallmark
Here's Lora hard at work on her watercolors. Such concentration.

Lora Hart
Lora Hart painting watercolor enamel


Across the table, Lorena was just as absorbed.

Lorena Angulo
Lorena Angulo painting watercolor enamel
And here are the results.

Torch-fired enamel by Lora Hart

Torch-fired enamel by Lorena Angulo
In between all the enamel, we visited some local galleries, where we got to admire two Cynthia Toops brooches with a loupe.  Tomorrow, we make journals before heading to San Antonio to Lorena's studio for more play time.

Monday, October 17, 2011

Glass Painting and Silver Clay Workshop at Gage Designs

I'm home from my weekend in beautiful Pennsylvania, where I led an exploration of painting on glass and setting glass into silver clay. The class of ten students did some beautiful work. Unfortunately for me, despite sitting in the charger for weeks (evidently unplugged), my camera battery was nearly dead. Luckily, Holly's camera worked!

Enamel on glass paintings by Holly Gage (two on left reverse, others surface)
The class learned two types of painting on glass: surface painting onto an opaque white glass with watercolor enamels and reverse painting onto clear transparent glass with opaque enamels. To appreciate the detail achievable in the paintings by the talented Holly Gage, you need to know that the glass size is 5/8" x 1 1/4"!
Enamel painting on glass
Top, L to R: Helene Richards, Karen Quirk Douglass (2); bottom: Kimberle Gage  Swanson
I also demonstrated my method of setting the glass in silver by pre-firing components and then firing the assembly with glass inserted.

Dorothy Thompson - painted enamel on glass set in fine silver clay
Unfortunately, I didn't get photos of all the work, but these photos were all posted by Holly Gage.
Enamel painting on glass set in fine silver clay
Karen Quirk Douglass
Painted enamel on glass set in fine silver clay
Terri Werner
Can you believe that this wonderful owl pendant was the first metal clay project ever for Terri Werner??? While Terri was a bit intimidated by the skills of her fellow students, I think this is a simply stunning piece!
Enamel painting on glass set in fine silver clay
Kimberle Gage Swanson
This beautiful pendant was designed and executed immaculately by Holly's sister-in-law, Kimberle Gage Swanson, obviously talented in her own right.

Enamel painting on glass set in fine silver clay
Christine Miller

Enamel painting on glass set in fine silver clay
Helene Richardson

It was a great trip. The students were fun, enthusiastic and productive. Holly did an amazing job of preparing and assembling supplies. She and her family also welcomed me into their home, where Holly shared her studio and supplies with me for late night play sessions, while her husband pampered me with gourmet meals (pumpkin lasagna!!) and her daughter, Megan, aspiring veterinarian, showed off her amazing domestic leopard cat and miniature rabbits. After a few days of rain, the weather turned sunny and gorgeous, with trees turning red, an amazing sunset after the last storm, and images recorded in my memory of pristine farms on rolling hills with Amish horses and buggies pattering past. 


Thursday, October 06, 2011

Glass Breakage!

That’s what I get for bragging on my technique for embedding glass into silver. I’ve never had cracks before, but here they are, right after I opened my big fat mouth.
Sunbird Necklace
Yesterday morning I took photos of the pendant and all was well. As I was constructing the necklace to hang it, I noticed a flash of color from the glass that made me pause. It appeared to be a fine crack starting from the back of the glass and propagating toward the surface.
Sunbird Crack
As the day wore on, the crack propagated, and more formed. There are multiple possible causes.

  1. Perhaps the mounting in this case was too tight. I left a bit of space all around the edges, as usual, so I suspect that’s not the cause.
  2. The back of the pendant was not completely flat, because of deformation caused by the bezel cup on the front. When viewed from the back, there is actually a depression where the cup is attached. I believe it’s more likely that non-uniformity of stresses across the glass could cause the breakage.
  3. Finally, I did some things differently in the enamel on this painting. Specifically, the enamel is much thicker than usual. Because the cracks really appeared to emanate from the back surface of the glass, where the enamel was applied, it makes me think this may really be the issue.
So, you can be sure I will be much more careful in the future, as I try to figure out these factors. Meanwhile, I’ve looked up the tricks of the trade for “healing” cracks in glass. It seems that windshield cracks are often mended by applying a resin to the surface, so I will see if a clear resin coat here will make the cracks less apparent.

Wednesday, October 05, 2011

Completed Freeform Glass and Silver Pendant

Yesterday I assembled the pendant and fired. Today I brushed up the silver and added a dark patina and set the labradorite cabochon. Next, I’ll be adding some special details to the necklace from which the pendant will hang.
sunbrid frontsunbird back
For those near Philadelphia, I believe there is one seat left in my upcoming two-day workshop, October 14-15, where you could learn all the details of the techniques I used in this pendant. It’s easy and fun and offers unlimited possibilities for adding color and personalization to your work. Contact Holly Gage for details.

Monday, October 03, 2011

Freeform Glass & Silver Pendant

As I mentioned, the new pendant has a different design process. The silver box form that holds the glass was formed first.

Then the front of the pendant was textured with tear-aways on both sides, and the hand-sculpted bird and branch were applied over the top. The bezel cup will hold a 10 mm cabochon.
Vickie Hallmark sun bird pendant glass enamel silver clay components
Only after the components were complete and fired did I trace the box form onto glass. After cutting and grinding to a perfect fit, I applied the enamel design to coordinate with the sculpted branch.
After assembly the pendant will be complete. This one called out for a very different necklace design, so I fused some Argentium rings onto the corners for attachments.

Tuesday, September 13, 2011

Back to Glass with Silver

I have a stack of enamel-painted glass tiles stashed in a drawer for the day when I make new silver mountings for them. Yesterday I cut and formed the metal clay pieces for a new pendant, and today I did a lot of detailed sculptural details on the front -- nothing fancy, but vines, leaves and bezel cups for cabochons. Tonight as the kiln is clicking away, I'm pondering the options for the glass to mount inside.

hand-painted vitreous enamel on glass

There are three types of enamel paintings here. One tile has just the black tracing. Several are reverse painted on clear glass with a coat of white on the back. The others are painted on the front with different enamels. The reverse paintings on clear are more vibrant, but they tend to react more with silver. Which to choose?

This is the technique I'll be teaching October 14-15 in Pennsylvania. One full day will be playing with the various enamels on glass. And the second day will be constructing a setting for one of the glass tiles. There are still seats available. Holly Gage has more information.

Thursday, September 08, 2011

Studio Setbacks

Some days are just not good studio days. Today I got SO close to finishing a ring that has sat on my bench for a year. I cut copper discs, then etched, domed, torch-enameled, relief-sanded and heat-patinated both. I chose my favorite for the ring and started to form the bezel around it. One of the reasons this ring mount has been sitting is that I didn't make it quite right. I made the bezel wall a bit too heavy, and I forgot to do the decorative edge before it was fired. Thus, today the bezel didn't fit as neatly as I would have liked, and the plain edge caused me to push the forming a bit too far. One slip and whack onto the enameled copper caused the glass to chip right off. See the bright, shiny copper area in the upper right quadrant? One ruined ring, this close to finished ...


What do you do when some days just go wrong? This isn't the only project I'm trying to progress on today, and it isn't the only one being difficult. 

Monday, July 04, 2011

Drawing and Painting with Enamels on Copper

My head is full of ideas now that I've spent a week exploring a variety of painting and drawing with enamels. Charity Hall is an incredibly gifted artist who originally trained as a botanist and is married to an entomologist (hence her many bugs). There were many scientists in class; perhaps we just naturally gravitate toward enamels?

Some of the huge number of Charity Hall's enamel samples.
I think the class should be renamed to "Enamels for the Intimidated" or something equally encouraging, since I fear the class title frightened the more artistically challenged. Our class of seven was just over half full, a shame as Charity was a terrific teacher and the material was not inherently difficult. Yes, to draw or paint realistically requires previous training, but most of the techniques had easy and effective applications not requiring so much skill. Everyone in our class loved Charity's shortcuts, developed out of her experimental nature to see what happens if she goes against traditional wisdom. For example, cleaning metal is not really necessary for opaque enamels, although it does matter for transparents.

CW from upper left: sugar coat, transparent green over P3 brushed over chasing, overfired  liquid 969, sugar over P3 and tracing black applied with pen, clear over P3 brushed over chasing, green enamel onto ink stamp on white base coat
The first day was spent making basic samples: sugar, orange peel, and glossy surfaces. We also experimented with simple surface design techniques -- enamel stamping, metal chasing, under and over firing, using black enamel with a pen or brush.

Graphite pencil over enamel base coat.
On the second day we learned to solder on sterling tubes for mounting stones and to prepare liquid enamels. One of the simplest techniques we learned involved drawing with a regular pencil onto a stoned enamel surface. The carbon from the pencil lead is absorbed by the enamel and leaves a permanent,  if faded, image.

CW from upper left: enamel over Micron pen, sugar clear over underglaze pencils, glass painting watercolors, metal watercolors, underglaze pencils, clear over P3 by pen
Next we coated substrates with the liquid enamel for sgraffito and learned to use watercolor enamels in decidedly un-watercolor fashion. Then we mastered using the flex shaft and burs to cut the mountings for the tiny stones.

Sgraffito samples
upper left overfired, center left too thick
upper and lower left with tube mount CZs

For the next to last day, we experimented with glow powder for pieces to be viewed in the dark, fusing silver balls and wire into enamel, drawing with a pen, and underglaze pencils. Finally, there were demos of constructing various simple mountings for enamels, champleve and cloisonne.
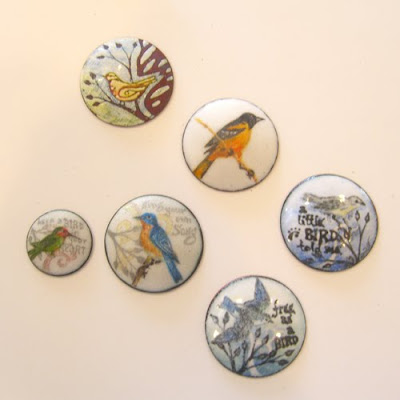
CW from upper left: watercolor over sgraffito, sugar clear over watercolor, base + watercolor + pen + clear,
overfired base + watercolor + pen + clear, base + underglaze pencil + graphite pencil + watercolor + sugar clear,
base + underglaze pencil + graphite pencil + watercolor + sugar clear
I got side-tracked with the painting, which offered the possibility to finally build surfaces in enamel that follow the procedures I use on my bird journal pages. Once I started experimenting with layering the different media, I stopped making single technique samples and started building more detailed trials. Enamels are fussy, requiring close attention in the kiln, and even then I unfortunately overfired several of my favorite samples. I experienced the crackle patterns of transparents over opaques, the ever present burn out of some colors, and loss of detail from a final clear sugar coat. My favorites, of course, look faded and blurred compared to before they headed into the kiln.

I came home with a long list of items to order so that I can continue my experiments and a desire to clean up my studio so that I have a good layout for this work.

Tuesday, February 22, 2011

Metal Clay Plus Enamel

Slowly I'm making progress on the great backlog of projects on my work table. The most recent piece to reach completion is an enameled pendant titled Aloft.


The base of the pendant is three different layers of smooth and textured metal clay, stacked to form a reservoir for the enamel. The bird and branches were hand-sculpted and added across the enamel opening. Finally the scrollwork and bezel were attached at the bottom. After the enamel was finished, I set the rainbow topaz.

I'm learning a lot about blending colors of enamel (I still need to get my color samples made, but I was too impatient to wait!) and the behavior of the enamel in the kiln. After several rounds of kiln enameling now, I'm thinking I really prefer torch enameling because of the control it offers. Of course, my Little Torch probably doesn't have enough power to attack a piece this large (2" x 1 5/8").

Next on the work table: two layers of silver (one sculpted similarly to this) awaiting a sandwich with enameled copper.

Wednesday, February 09, 2011

Master Muse Project -- Enameled Earrings

I'm a bit sad to see my tenure as a Master Muse coming to an end. Today my final challenge tutorial appeared on Tonya Davidson's blog. You can see all the past Master Muse tutorial synopses (this is #48!) here.


The challenge for this sixth project was to use syringe creatively. I personally like drawing with syringe clay, so I designed a pair of earrings utilizing the syringe lines to create cells for enamel. Traditionally, fine wires are shaped and attached to a metal backing in the technique of cloisonne, so this is a quick and easy way to get that look. I wet-packed the enamel into the cells, using a variety of colors to create shading and depth.

It was a fun project, despite a few frustrations. I kiln-fired the enamels, using the Paragon SC-2 that I use routinely for metal clay. I don't typically use this kiln for enamel (I have another tiny kiln that I prefer because it recovers faster), but thought I should use the one that most potential users of the tutorial would have on hand. I found that the door closure jarred the enamel powder enough to scatter it on the face of the piece. Boo, hiss! Unwanted color in the crevices. But then I went and read my copy of Pam East's Enameling on Metal Clay and found that she learned this before me. If only I'd done my research, I could have followed her recommended fix before I made the blooper.

As I tell my students, making these mistakes is the best way to ensure that I'll remember the lesson next time.

Thursday, February 03, 2011

Inspirations of the Enamel Variety -- Jessica Calderwood

Enamels are definitely on my mind. I signed on this week to take a five-day workshop with Charity Hall during Idyllwild metals week. Five entire days focused on drawing and painting with enamels! I thought it appropriate to dredge up an enamel artist from my files who also directs her enamel work toward the drawing and painting directions.

01sleeping%20beauties

Jessica Calderwood's fabulous wall pieces and jewelry range from meticulously painted portraits to details of body parts. Some are quite humorous, such as the series of curler brooches. I love the superposition of the gold details. Others have more disturbing implications, such as "Consumption."

10personalmaintenace

I find her settings to be quite as intriguing as the enamels themselves, with rotating mounts and double-sided pieces, such as this brooch, "Blink."

16blink%20web%20copy17blink

An extended exploration of enamels, on both glass and metal, is in the offing for me, since it seems the perfect way to blend my journaling with my jewelry. Today I ordered fine silver sheet to make a load of color samples with the new enamels I purchased at Linda Darty's suggestion. I can't wait to develop a new palette. 

Thursday, January 27, 2011

Inspirations of the Enamel Variety -- Linda Darty

I've been playing with enamel on metal clay, something that I circle back around to occasionally. I keep thinking that I'll find time to immerse myself in enamels and actually make some of the pieces in my sketchbook designed with them in mind. Of course, since I only play for a short time before I get distracted by the next deadline, I never make as much progress as I'd like, so I've vowing to try to stick with this for a least a little while and try some new things. I use enamels on glass all the time, so the urge to do more enamel on metal is obvious. I like the painterly nature of that material, the luscious burst of color that it imparts, and the challenge of mixing my two favorite media (metal and glass).

Whenever I start dabbling with one of my aspirations like this, I inevitably start pulling up inspiration from my collection. I thought maybe you'd like to jaunt along with me on in my explorations, to see who amazes me and lures me to try crazy things.


Today, I'm inevitably thinking of Linda Darty, whose book "The Art of Enameling" is by far my favorite on the subject. Linda, in person, is as expansive and charming as her book. I had the pleasure of scheduling a 1-2-1 critique with her at the last PMC Conference, and I came away with pages of scribbled notes, a shopping list for new enamels, and a head bursting with ideas (all still trapped inside, I'm afraid). The first time I ever became aware of Linda's work was at Materials: Hard & Soft, where several pieces from her Garden Brooch Series resided in a case near my wall quilt, "Falling Through the Cracks." These are still some of my favorites of her work, closely followed her badge brooches and her new hydrangea series.

4_cloisonne-broochesweb.jpg

4_redwinter72.jpg

Luckily, I did order the enamels she recommended to me, so they are here waiting for experimentation. I think it's time to get started.

Wednesday, December 22, 2010

Enameled Copper & Silver Clay Pendant

The holidays are sucking away my studio time, much to my dismay. I'm holding out for some intense days of creating between Christmas and New Year's Day. I did manage to find a few minutes to set the enameled copper disc into its mount with dyed concrete. Then I popped the peridot into the bezel cup. Now, I'm trying to figure out stringing for the neckpiece. Beneath the leaves at the top is a horizontal tube bail, fairly small size, so I need a special neckwire, beads or some fancy wirework to finish the piece.

Sunday, October 31, 2010

To Enamel or Not?

I'm trying to decide if these projects are destined to be enameled. It influences my construction. Do I build a perimeter to contain and protect the glass enamel? Or am I free of the wall constraint?


Even when I sketch, I never know how the piece will turn out until it's finally done. There are so many decisions to make along the way.

Tuesday, October 05, 2010

Enameled Copper Discs

Another bit of progress over the weekend: enameled copper discs. These are three of the hand-drawn discs I showed several weeks ago, which were etched and then sat around oxidizing. It really didn't take too long to pickle them to remove the oxide, dust a coating of enamel over them, and then quickly torch fire. The long part was the removal of the top layer of rock-hard glass with a diamond hand pad. It's a laborious project, done under running water, to remove just enough glass to reveal the raised copper design, but without removing desired glass around the edges.


In the upper left corner, you can see a leaf that appears pink, indicating that the copper is still protected beneath a very thin layer of glass. More sanding required.

I have a couple more to do before I decide which one to set into the silver mounting I made, from this drawing.

Monday, September 13, 2010

Copper Enamel Settings

It was a busy weekend, so I didn't make much progress on the copper enameling. I did think on my silver settings at least. I'm debating brooch vs. pendant, bail styles, and how ornate to let these little rascals get.

This one is sitting on my worktable, without its top, while I debate the bail construction.

Saturday, September 11, 2010

New Copper Enamel Attempts

I've been sketching new ideas for setting enameled copper. That induced me to get out the copper discs and start drawing and etching.


Here's what they look like, with hand-drawn bird scenes, ready to etch.


And others after the etch bath, ready to dome and enamel.

Today's selection from Bruce Mau's Incomplete Manifesto of Growth:

21. Repeat yourself.
If you like it, do it again. If you don’t like it, do it again.

Wednesday, July 21, 2010

More Concrete Plus Copper Enamel

The second pendant made from the over heavy earrings is finally finished, after two rounds of stringing. The first set of fossil coral ovals seemed too heavy, so I had to replace them with the smaller spheres.


This is leftover etched copper with torch-fired enamel, set into a fine silver clay box, filled with butterscotch concrete. The stones are fossil coral, freshwater pearls, and Swarovski crystals.


Whew! Now, are the cabochons I'm waiting for in my mailbox, I hope? I have some bracelet clasps here waiting.

Sunday, July 18, 2010

Torch-Fired Enamel Earrings

I've been working on more torch-fired enamels and earrings to set them into.


Here's the first set. Hand-drawn black enamel on two layers of white, for a total of three torchings. I'm learning that I have to be careful, as the black enamel spreads when it stays hot too long.

The texture is a tear-away of a handwritten letter in French.