Showing posts with label sterling clay. Show all posts

Sunday, August 12, 2012

Simple Jewelry

To balance out the more complicated earrings I've been drawn to lately, I decided to whip out a few super simple pieces this week. I pulled out a texture that I've not used much to cut pieces for these two pair of earrings, accented with pearls. I've procrastinated on purchasing pearls, because the ones I wanted are expensive. I wanted the nice large round pearls, not the tiny ones or the rough shaped ones, and that made them seem too pricey when looking at a full strand. But I finally convinced myself that parsed out one or two at a time, they don't really add that much to the materials cost of my jewelry, especially when paired with a simpler silver component.

Finch earrings
©2012 Vickie Hallmark
sterling clay, Argentium wire, pearl
Sparrow earrings
©2012 Vickie Hallmark
sterling clay, Argentium wire, pearl
This super simple pendant got a silver leaf drop before the pearls arrived.

Flock pendant
©2012 Vickie Hallmark
sterling clay, Argentium wire, sterling chain

Wednesday, August 08, 2012

Working with Jewelry Components

As I try to increase my jewelry production, I'm exploring the idea of working with components. I find it much easier to sit myself down at the bench to produce a given small component than to conceptualize a new overall design. Thus, I can make a hundred tiny leaves or a load of hallmarks to go on the back of all my pieces. Since I've been experimenting with flowers lately, I've gotten my technique down for cutting a very simple five petaled flower from a disc. A few cuts, a few smooshes with a shaper and there's another one.

Anemone earrings
©2012 Vickie Hallmark
sterling clay, Argentium wire

Then I can utilize the components in a myriad of ways. I'm outputting them in both fine and sterling clay, so they are ready for either fusing onto Argentium bases or incorporating into a larger metal clay piece. Some of the easiest jewelry is just simple combinations of flowers and leaves made into pendants and earrings via a few (metal clay) jump rings.

Anemone 2 pendant
©2012 Vickie Hallmark
sterling clay, Argentium wire
By the way, sterling components fuse onto Argentium just as well as the fine silver. Interestingly, the copper rises to the top of the sterling, but doesn't seem to really firescale, at least in the time required to fuse. I simply remove the copper with citric acid pickle.


Friday, August 03, 2012

Sterling Clay Pendants and Fused Chain

For whatever reason, it seems I make earrings more than anything else, followed by pins and bracelets. I don't make enough pendants or necklaces, so this week I decided to make a few for an upcoming show. The first is the simplest of five-petal flowers and leaves sandwiched together, with what is becoming my trademark leaf drop. While searching for misplaced wire, I found an old stash of snake chains that are perfect for hanging such simple pendants.

Anemone pendant
©2012 Vickie Hallmark
sterling clay
Then I decided to made a treetop pendant. I reverted to the triangular shape that often appeals to me, but I flipped it over so that I could hang an entire row of leaves from the bottom. Having trouble deciding how to do the bail, I finally settled on two half jump rings on either side in the back. Since a chain would show if just run through the two loops, I needed to affix jump rings to either side.

Canopy pendant
©2012 Vickie Hallmark
sterling clay, Argentium wire
That led me to thinking about how I've been wanting to make my own chain. So I pulled out the jump ring maker, never before used, and cranked out my first completely fused Argentium chain, which was easy but tedious. I consider it great training in heat control, with few links melted or deformed. There are actually soldered links next to the leaves that break up the chain, but at the very end I was able to fuse the links next to pendant, as I developed more skill in holding the piece with only the joint exposed to the flame.

Warbler 2 earrings
©2012 Vickie Hallmark
sterling clay, Argentium wire

Of course, I still made earrings!

Tuesday, July 31, 2012

Combining Sterling and Fine Silver Clays

I still get blank looks sometimes from people who think that different silver clays cannot be mixed. From a chemistry point of view, all the silver clays are totally compatible, with the caveat of potential shrinkage mismatch. I routinely mix Art Clay syringe with PMC clay. The very first piece I made in sterling clay had a bit of fine silver syringe work added. Yesterday I loaded up the kiln with sterling and threw in a couple of pieces that have been on my bench for months. They were in an area of my bench that I've come to reserve for sterling clay, so I slapped sterling hallmarks on the back and fired away.

Fine silver clay with sterling clay applied
After the first stage open shelf firing, it was obvious that they were actually fine silver. The color of the two green clays is pretty different, with the fine silver being whiter, but these had sat out long enough to darken due to sulphur from the air. After the first stage firing, the two pieces were bright white, while all the others were even darker gray. No fear! The sterling hallmark still needed to be fired in carbon, so I packaged them all up and fired again.

Sterling clay components (and a couple of fine silver)
fresh from the kiln

The sterling comes out of the carbon with a light golden color, which cleans right off.  The fine silver components come out bright white. Once it's all polished and patinated, the difference is less obvious.

Sunday, July 29, 2012

Amethyst Starling Brooch

Naming jewelry is always a tricky thing. I want a name that connects to the piece somehow, but after using birds in my jewelry for years, I'm having more difficulty with originality. This morning, after staring at the latest brooch, which I eventually set yesterday with rose-cut amethysts, because those were the stones I had in my stash that fit best, I was stumped. But Google is my friend, as a quick search for amethyst+bird turned up an amethyst starling, which I'd just seen in my Pinterest feed. So there you are.  Serendipity.

Amethyst Starling brooch/pendant
©2012 Vickie Hallmark
sterling silver & rose-cut amethyst
Amethyst Starling brooch/pendant, reverse
©2012 Vickie Hallmark
sterling silver & rose-cut amethyst

Monday, July 23, 2012

Earring Madness

I've been trying to get into a groove with earrings, both metal clay and Argentium. I just keep working back and forth between the two. For Argentium, I'm fusing on fine silver. For the metal clay earrings, I'm working with sterling clay. My kiln is staying very busy between the two. More on the way.

Flower Basket earrings
©2012 Vickie Hallmark
fine silver flower sand leaves fused to Argentium sheet and wire
Dark Flock earrings
©2012 Vickie Hallmark
sterling silver
Leaf Nest earrings
©2012 Vickie Hallmark sterling silver clay


Sunday, July 22, 2012

Behind the Brooch

I have been plugging away at several new brooches, because I want plenty to select from when I submit images to "Behind the Brooch," a CraftHaus online exhibit organized by my friend Lorena Angulo. The point of the exhibit is that the back is just as important as the front of the brooch. I always lavish love on the backs of my artwork. I think half the reason I won national art quilt awards back in the day was that I took the philosophy that the back was another canvas and made the quilts truly double sided. If you ever visit Paducah, KY, stop by the National Quilt Museum to see if my quilt, Enlightenment, is on display and ask to see the back. Or for a time now, you can see another of my double-sided quilts, Tailspin, as part of the Texas Quilts Today exhibit at the Texas Quilt Museum in La Grange.


I've returned to sterling clay for two new brooches (and a lot of other new work). The first is Silver Lining 2, which will replace the first Silver Lining which suffered from slight blistering on the back. Of course, remakes always get upgraded a little, so I took the opportunity to add a quote to the back of this version: "Every cloud has a silver lining." The first Silver Lining will be reclaimed.


The other new brooch began with a window piece that lay on my bench for months. I decided it needed to not be open after all, because I wanted that back canvas to work on. So I added a textured oval to the background, and then set to work on the reverse.


I wanted this piece to be worn as either a brooch or a pendant, so the vertical format works better. The large leaf at the top over the pin hinge forms a bail for a chain.


I love the strength of sterling clay. I would never form such delicate pin mechanisms in fine silver. The mystery with this piece will be how the shrinkage works out with those fine silver bezel cups affixed, which won't shrink. I expect some movement. 

Tuesday, April 10, 2012

Creating New Work with Old Ideas

This week I wanted to create a signature piece of jewelry, one that would epitomize my work. I've made several small pendants lately, but I decided I needed a necklace composed of multiple links. I pulled out the sketchbook and riffed on lots of recent ideas, including the triangular and cloud shapes of recent brooches. None of them looked right.

Flock necklace sketch
©2012 Vickie Hallmark 
As I chatted online with my friend, Lora Hart, she suggested that I use the pillow shape I mentioned just yesterday in my earring variations. What insight! How obvious in retrospect! That ability to cut right to the heart of the matter is why she's a great mentor (check out her her Mentorial if you need your own pop of insight). I quickly abandoned Skype and sketched a rough idea of the idea.

Flock necklace templates
©2012 Vickie Hallmark 
Then I pulled out the index cards, cutting at least three variations (different colors) until I got the proportion just right. After more than an hour of intense work, I finally moved to metal clay.

Flock necklace, ready for firing
©2012 Vickie Hallmark
sterling silver clay
Twelve hours later (!), I gave up on the idea of stones, since I didn't have what I wanted in the stash, and committed the sterling clay greenware to the kiln in its first, open shelf firing. This morning, I buried it all in carbon and restarted the kiln for sintering. Why didn't I think to build it in fine silver clay, which always fires perfectly?? Please, kiln gods -- fire my sterling clay perfectly!

Sunday, April 08, 2012

Developing a Personal Voice by Working in Series

So you're wondering how to get from simple, beginning, generic designs to your own recognizable artistic style? The idea is to develop a personal vocabulary of shapes, motifs, and components that  can be combined in a multitude of original ways. One idea builds on another, with only slight variations from one to the next, but over time persistent evolution refines the design.
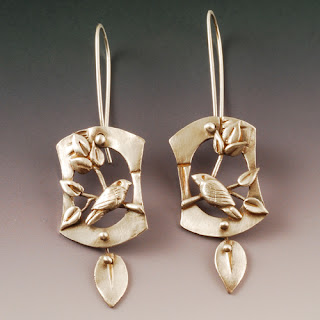
Warbler earrings
©2012 Vickie Hallmark
sterling silver
One starting point is the idea book or board. For years now, I've maintained a Book of Attractions, filled with images cut from magazines of work that speaks to me -- ceramics, fiber, wood, stone, metal & glass all appear. Of course, everyone is doing their own collections on Pinterest, and I'm no exception. The one thing I recommend in terms of really utilizing the boards (or old-fashioned book) to advance your own work is to analyze what about the piece attracts you. Which shapes repeat? What colors captivate? Finding the themes of the work that your soul is drawn to can help you make work that is true to your own self. This is not a license to copy, but a hint of where to start to develop your own personal style.

Bird & Nest Shield earrings
©2012 Vickie Hallmark
sterling silver
For example shields have recurred in my clippings or pinnings for many years, so I know I should use shield shapes in my own work.  Coupled with my favorite bird and nest motif, using custom textures made from my original drawings, these earrings are the simplest version of my self.
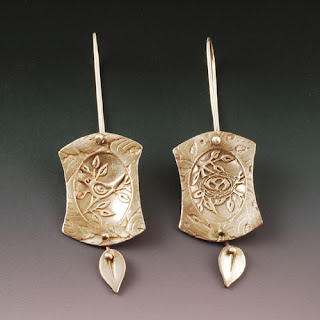
Flock earrings
©2012 Vickie Hallmark
sterling silver
The squeezed pillow shape from my Flock and Birdwatching bracelets is also one of my favorites, so I have used it repeatedly. Variations abound. I can cut a plain tile with my texture, as in the original Flock bracelet.  I can cut an opening and build my trademark sculptural bird on a branch across it. A box behind a window can hold a painted tile of glass. I can split the shape into two or more pieces, with a window that is flat and an oval or other shape that is domed, convex or concave. A box bead, or two domed tiles attached at the corners for a truer pillow shape would give even more dimension. Once I get going with the variation brainstorming, ideas really start popping. I can change the color by using patina or resin or gold keum boo.  I can add extra components that reflect the rest of the work, like leaf dangles.

The best way to evolve the work is to make more. Slow but steady variation leads to new ideas and personal work. Develop a list of shapes, textures, colors, marks and components that can be used to generate never-ending variations on a simple theme.

Thursday, April 05, 2012

Resin Sterling Clay Earrings

I decided to play a little more with resin to add a jolt of color to some simple earrings. I started my experiments with my poor bubbled back sterling endeavors.

Resin Bird & Nest Earrings
©2012 Vickie Hallmark
sterling silver, resin, moss agate
To get the beautiful aqua color, I mixed a tiny bit of alcohol ink with the Ice resin. Then I added moss agate drops.

Resin Bird & Nest Earrings
©2012 Vickie Hallmark
sterling silver, resin, moss agate
To demonstrate the intriguing aspect of the bubble problem during firing, the backs are horribly pocked on the textured backs of the domes, but hardly marked on the smooth windows. Fascinating, no? I know the common suggestions are overheating from kiln temperature spikes, but the localization doesn't seem very consistent with that.

Monday, April 02, 2012

Continuing Sterling Clay Experiments - The Bubble Saga

Over the weekend, I ran two more loads of sterling clay, with mixed results. I had the working theory after my failures last week that moisture was the root of my bubble problem. The latest experiments say that cannot be the issue, leaving me without a working theory for what is causing the problem.

Flock earrings
©2012 Vickie Hallmark
sterling silver
Flock earrings, reverse
©2012 Vickie Hallmark
sterling silver
After drying these Flock earring components to death, they fired in my test run perfectly. I went back to the full 1500°F with no signs of overheating. No signs of bubbles, front or back.

Treetop pendant 2
©2012 Vickie Hallmark
sterling silver, before patina
Then I committed the more intricate work waiting on the bench -- two pendants and a sculptural pair of earrings.  The front is pristine.

Treetop pendant 2, reverse
©2012 Vickie Hallmark
sterling silver, before patina
The back of this pendant has major pox. No fiber blanket was used, but I did prevent trapping carbon in the openings during shrinkage by encasing the pieces in stainless steel screen.

After drying for several days, trapped moisture seems unlikely to be the problem. The isolation of the bubbles to the reverse of the piece still stumps me. One hint I see is that textured backs are giving more trouble, although I did get bubbles on one corner of a smooth back earring. The texture was made with tear-aways, lubricated with olive oil. Of course, I used olive oil on the front textures, too, with no problem, so olive oil shouldn't be the culprit.

I'm still thinking. Any ideas?

Monday, March 26, 2012

The Sterling Silver Clay Learning Curve

Although I've completed quite a few projects now in sterling clay, with minimal issues, this week introduced me to a range of more severe difficulties.

Silver Lining Brooch
©2012 Vickie Hallmark
sterling silver
This cloud brooch was the largest project and looks great from the front. On the reverse there are areas that bubbled. When this happened earlier this week to a set of smaller pieces, I thought perhaps it was a kiln temperature overage. For this firing, the temperature was reduced from 1500 to 1480°F, but the bubbles still appear on the back only. In this case, the brooch was supported laying flat on fiber blanket with a screen over the top to prevent trapping carbon in the carving.

©2012 Vickie Hallmark
sterling silver clay
bubbles from trapped moisture?

Bubbles are most pronounced in the cloud appliqué and surrounding area, which makes me think that they might more likely be due to trapped moisture. The appliqué was made as a separate 1 card (texture up to 2 cards) thick piece that was added after drying. Perhaps moisture was trapped under the dry surface. I'm not certain how long the piece dried before firing, although I sort of thought it was overnight.

Beyond the bubbling, I managed to break my first piece of fired clay.  It seems I got a bit cavalier about this piece. I had the brooch all cleaned up and ready to patina when I decided to give one final tweak to the pin clasp, right in its weakest area. I snapped one of the toes of the clasp right off. In retrospect, it's obvious that I actually should have reinforced that piece to begin with, so this was my opportunity to do so in a second step.

©2012 Vickie Hallmark
 sterling silver clay repair
After adding more clay, I skipped the open firing and went directly to the carbon firing. The repair looks flat and dark after firing, much like after the open shelf firing, so at first glance it looks unsintered. However, a quick bit of clean up reveals nice shiny silver below a shallow dark layers.

©2012 Vickie Hallmark
sterling silver clay repair

Friday, March 23, 2012

New Sterling Clay Brooch Designs

I was so close to putting a bronze carved treetop brooch into the kiln, and then I pressed an appliqué onto the back just a bit too firmly and cracked the piece. Although I've instituted repairs, I fear it's unlikely to be super successful, so I started a new version in silver.

Silver Lining brooch
©2012 Vickie Hallmark
sterling silver

I cut out a new cloud shape 4 cards thick, then carved the sun and rays into the background. I left some edges plain, but the piece seemed to need something, so I added texture with the curls that carving creates. Finally I sculpted a flying bird and the treetop. By this time, I wasn't sure that the curls might be too much, but decided to fire it anyway.

Silver Lining brooch
©2012 Vickie Hallmark
sterling silver
The back has the same appliqué that doomed the bronze brooch.

I'm suddenly a bit concerned about firing the brooch, as I had a set of small earring and pendant pieces come out of the kiln with bubbling on the backs, but with perfect fronts. Only the backs were in contact with carbon. As the fronts were open, I covered them with stainless steel screen before burying in carbon. So now I'm not sure if my kiln is running a few degrees too warm, or if the issue was that I attempted to work really thin at 2 cards. Back to thicker clay for the replacements, and perhaps dropping the temperature by a few degrees as well. Meanwhile, Silver Lining is in the kiln.

Thursday, March 08, 2012

More Sterling Clay Repairs

The second treetop brooch came out the kiln with some minor issues of its own. First, there were a couple of branches that had breaks, one at a seam and one behind a bird where it didn't show. In both cases, I added more clay and refired, which worked fine.

©2012 Vickie Hallmark
Treetop 2 brooch
sterling silver
You'll notice I haven't inserted the stainless steel pin stem yet. After the first Treetop brooch, I realized that the the pin stem shows through the open center of the brooch, so I decided I should do the photos before I install it.

©2012 Vickie Hallmark
Treetop 2 brooch, reverse, without pin stem
sterling silver
Other issues that arose are hidden on the back. This brooch was my first use of tube set CZs for the brooch mechanism. I used the extruder to form a tube of clay, then opened the center of the tube with a stone setting bur to hold the stones properly. I filled the lower space in the tube to make it solid and more sturdy, but then cut slots in the clasp posts for holding the pin stem closed. Since I didn't think to support the cut tubes somehow, both sagged due to gravity during the firing and subsequently the slots had to be filed out and the tops aren't level. Also, either I didn't get the stones transported to the kiln straight (I was very careful when I first installed them) or they moved during the firing and aren't seated in the tube settings nicely.

These are overall minor issues, but I am trying to get better at controlling all the little details so that I can present the very best work possible. So all these mistakes are opportunities to master my technique and develop solutions to these issues.

Wednesday, March 07, 2012

Repairs with Sterling Clay

My first set of repairs with sterling silver clay came out of the kiln yesterday. I wasn't sure how to approach it. Is it really necessary to do a full 2-stage firing for a tiny repair? So I experimented.

Bird Heart back
©2012 Vickie Hallmark
sterling silver

This hollow heart charm developed a crack on the initial firing because I buried it without thinking about the carbon inside causing pressure during shrinkage.


To make the repair, I added fresh sterling clay, not trying to perfect the seam, but pretty much just piling it on over the crack (unfortunately, I didn't take intermediate photos!). I skipped the open shelf firing, reasoning that there would be enough oxygen in the kiln to burn out the tiny bit of binder. Then I placed the heart on a scrap of heavy-weight fusing shelf paper to protect the opening when buried in carbon. I did a shorter, 1-hour firing at 1500F.

When the heart came out, the new clay was darker than the old, so I worried that perhaps it hadn't sintered. The shelf paper was grayish black instead of the usual white. I know that the paper turns black as its binder burns out, but then goes white and powdery when fired in oxygen. When I hit the repaired silver area with the polisher, it went bright silver, relieving my worst fears. Then I took some sandpaper to the back to remove the slight elevation of the repair. After working through finer grits, I can't see the repair at all except maybe a tiny divit at the edge that I still need to polish out, so I'm calling this one a success.

Now I just need to clean up the hole, which evidently got a bit of clay as well, and republish the heart opening edge and call it finished!

Tuesday, March 06, 2012

Embedding Wire into Sterling Metal Clay

I totally love the new sterling clay! The idea that I can embed sterling posts for earrings or pearls or other attachments is just so appealing.

Double Leaf Earrings
©2012 Vickie Hallmark
sterling silver
These are the latest sterling earrings in my collection, with double leaf-textured leaves, coil/snake stems and embedded sterling wire posts. 2 1/2" long. Strong, sturdy, work-hardened! With the glow of sterling that is so much warmer than fine silver.

Double Leaf Earrings
©2012 Vickie Hallmark
sterling silver

Thursday, February 02, 2012

Hallmarks and Purity Marks for Metal Clay Jewelry

I have a fetish for the backs of my work. I want the reverse side to have as much care and planning as the front, so I often embellish it. Even adding hallmarks and purity marks should be done with a degree of finesse.


Because all my recent work is sterling, I want to mark it with .925 (sterling is 925/1000 silver). I could just stamp it during the process, but that runs the risk of marring the front side. My solution is to stamp into a thin sheet of fresh clay, then cut out tiny decals to adhere. I use the same process for my hallmark. (In case you're wondering, my name is for real -- I was born with it!)

Here's my process:
  1. roll a sheet of clay one card thick
  2. gently mark with a commercial steel .925 (or .999) stamp or hallmark
  3. use a cutter (a straw or tube) to cut out a circle around the mark, or use a knife to cut straight sides
  4. dry and refine if needed
  5. to attach, simply moisten both greenware surfaces with a damp brush and press firmly together
  6. add a light wash of water with the brush around all the edges and then dry
  7. fire piece as usual

Voila! Professional markings in little time. Hint: I make a bunch of each mark at a time, then store the dry decals in a container to be ready when I need them.

Here are the latest sterling clay earrings, from the front:


Wednesday, February 01, 2012

More Sterling Clay Experiments

I ran another course of sterling clay through the kiln last night, technically finishing my Four a Month project on time, although I didn't do the patina until today.


I made a couple of small hollow-form heart pendants or charms.


This first one taught me to remember to protect openings from the carbon, as the carbon wedged inside the piece caused it to crack. I'll have to repair it.


This version utilized fine silver syringe work on top. It's not true that fine silver must be fired in air -- it works well! It IS necessary to remove the binder with oxygen available, for all of the metal clays in fact. But after the binding is gone, sintering takes place either open or buried in carbon. Fine silver and gold were the first metal clays manufactured because the pure metals don't oxidize when sintered in air. However, nothing untoward happens when they are sintered without oxygen, as long as the binder has been removed.


One interesting detail here is that the two hearts were cut from the same templates, but came out different sizes. I assume this is a function of all the fine silver line work, which doesn't shrink as much. I'll have to think about how this could be useful.