Showing posts with label brooches. Show all posts

Sunday, July 22, 2012

Behind the Brooch

I have been plugging away at several new brooches, because I want plenty to select from when I submit images to "Behind the Brooch," a CraftHaus online exhibit organized by my friend Lorena Angulo. The point of the exhibit is that the back is just as important as the front of the brooch. I always lavish love on the backs of my artwork. I think half the reason I won national art quilt awards back in the day was that I took the philosophy that the back was another canvas and made the quilts truly double sided. If you ever visit Paducah, KY, stop by the National Quilt Museum to see if my quilt, Enlightenment, is on display and ask to see the back. Or for a time now, you can see another of my double-sided quilts, Tailspin, as part of the Texas Quilts Today exhibit at the Texas Quilt Museum in La Grange.


I've returned to sterling clay for two new brooches (and a lot of other new work). The first is Silver Lining 2, which will replace the first Silver Lining which suffered from slight blistering on the back. Of course, remakes always get upgraded a little, so I took the opportunity to add a quote to the back of this version: "Every cloud has a silver lining." The first Silver Lining will be reclaimed.


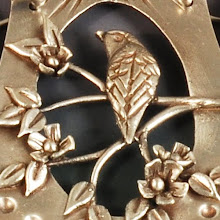
The other new brooch began with a window piece that lay on my bench for months. I decided it needed to not be open after all, because I wanted that back canvas to work on. So I added a textured oval to the background, and then set to work on the reverse.


I wanted this piece to be worn as either a brooch or a pendant, so the vertical format works better. The large leaf at the top over the pin hinge forms a bail for a chain.


I love the strength of sterling clay. I would never form such delicate pin mechanisms in fine silver. The mystery with this piece will be how the shrinkage works out with those fine silver bezel cups affixed, which won't shrink. I expect some movement. 

Monday, July 09, 2012

Troubles with Fusing Gold to Argentium

“No plan survives contact with the enemy.” — Field Marshal Helmuth von Moltke
Every mistake is a design opportunity. 

And so it goes in the battle of learning Argentium silver. When I attempted to fuse the fine silver and gold pieces onto the Argentium base, the gold sank right into the silver at the top of the brooch and seemed to alloy to the point of not even being able to see it.  Ronda had warned me that the gold would tend to heat faster and cause issues. Now I see what she meant.  I ground out the remains and replaced the gold, thinking that I would add the one piece carefully and stop earlier, but again it got away from me. This large piece is clearly hard to heat and monitor evenly. And in the course of trying to stop short for the sake of the gold, I fear I have under-fused other pieces onto the Argentium. That became clear when I started cutting out the brooch and a few granules popped off. 
©2012 Vickie Hallmark
Carly brooch, gold removed
Argentium sterling with fine silver
So now I've cut off all the troublesome parts and soldered on large granule decorations along the edge. I'm reading this as a case of gold being superfluous to this design, so I'm sticking with all silver. 
©2012 Vickie Hallmark
Carly brooch, reverse
Argentium sterling with fine silver
The open, soldered granules give a lot more interest to the back of the brooch, so perhaps the lost battle is a good thing in the long run. The quote and hallmark are also in place, and now it's time to finesse the fit on the stone. 


Working with traditional fabrication is frustrating in some ways. I'd hoped that using Argentium for the majority of the work would reduce materials costs, but so far I'd say that's far offset by labor costs. Hopefully, my experience will improve my success rate. I know I can make what I see in my head with metal clay, but the combination of metal clay with Argentium is still a learning process for me.

Friday, July 06, 2012

Bird Song Brooch in Progress

The second of my quote brooches is coming slowly along. Last night I fired a couple of birds, the quote and hallmark, and a pile of fallen leaves. This morning I'm arranging these fine silver components onto the Argentium base that I previously constructed. You can see the bezel for the triangular hemimorphite druzy in place at the bottom right.


If you look closely, you'll also see 18K gold hammered granules at the top and next to the bezel. I'm about to go cut tubing for the "berry" tube set stones. These will all be fused in place before I flip the brooch over and start adding the back pieces with solder.

To see the sketch with the druzy, visit the post about stone inspiration. I'm debating a departure from my normal naming scheme, which always includes "bird," to one referencing the author. Since this piece will have a quote from Carly Simon on the back, which you can see in my texture design process, I'm thinking it might be the Carly brooch. What do you think? Carly or Bird Song?

Thursday, January 05, 2012

Mad for Brooches -- Double Stem Pin Back Mechanisms

Since I spent so much time recently agonizing over how to do my pin back, I thought I'd corral a bunch of inspiration and how-to here for my future reference and to help any of you who might also be searching for input.


But first, here's my back, finished with the inserted double pin stem. I rank this as quite easy! This photo raises an interesting question of how to photograph a brooch that is open enough to reveal the closure mechanism. But that's a question for another day. Today, let's consider interesting versions of double stem pin backs.

Aran Galligan
This is the ultimate in double pin stem mechanisms - a stand to hold the brooch when not wearing!

Chris Irick
These turbine brooches have the classic tube hinge and wire catch construction, but the pierced backs and curved pin stems elevate the look.

Shana Kroiz
An interesting variation is shown here, with a constructed hinge and soldered stem wires.

In terms of instruction, there is a simple diagram of a double pin stem system in Charles Lewton-Brain's Ganoksin entry on Hinges and Hinge-Based Catches. He also has an entry titled Some Hints on Pinback Placement.

Murano Silver
For a simple single stem fibula, try Nicola Callow's blog tutorial, which demonstrates soldering both ends of a sterling wire onto the back, then cutting and shaping the spring loaded pin and the catch.