Showing posts with label workshop. Show all posts

Wednesday, May 08, 2013

Bob Ebendorf Workshop

Bob Ebendorf is renowned for his teaching skill, so I jumped at the chance to take a short workshop titled "A Brush with Creativity" at the Cos House in La Villita, sponsored by Equinox Gallery. Based on a collection of found objects provided by the organizers and enhanced by anything we brought along, our assignment was to construct one or more artist brushes.


My first attempt was a simple wrap of coque feathers tied around a butter knife with a scrap of reclaimed silk ribbon. Bob characterized it as very Indian in feel, which seemed appropriate as I have some trace Indian ancestry. It reminds me of an Indian implement in my collection that has green feathers and wraps of white rabbit skin and fur, so this will complement it beautifully.


I also made a pair of brushes based on porcupine quills that I scavenged along a roadside in Italy. Both have feathers, one as the brush itself and one as embellishment, and the bristle brush is enhanced with a copper electroformed cicada wing.

Finally, while rounding up odds and ends to work with, I thought of these tubes that I've stashed for years. Wrapped with quilting scraps and thread ends, they provide a colorful handle for simple marabou  brushes. The curved brush has two handmade glass beads scavenged from the bead reject bowl.


During the discussion, Bob suggested that I consider winding the long metal tubes into a spiral and forming the brushes into brooches. I was reminded today while gathering fiber and glass bits to combine with metal that I love all my special media and should give some serious thought to combining them as I move forward. There were many amazing brushes on the table to inspect. It's fascinating to see what attracts and motivates individual artists.


Tuesday, February 26, 2013

Buyers Market of American Craft

I recently traveled to Philadelphia to attend the Arts Business Institute workshop on wholesaling, which was held in conjunction with the Buyers Market of American Craft. I actually went a day early to help my friend Wendy McManus set up her booth for her first experience at BMAC.


The weekend was an intense one. I spent a good number of hours helping Wendy hang curtains and signs over the provided pipe and drape. Lorena Angulo also attended the ABI workshop, so I had the chance to catch up with her. Although we live less than two hours apart, we often seem to travel to visit.

The first day of the workshop featured Bruce Baker, noted for his entertaining presentations on sales and booth design speaking about both of those topics in relation to wholesaling. I've heard Bruce speak at least twice in the past, and while I heard a bit of repeat, most of the information was new. We also were treated to a detailed presentation on Pricing for Profit by Megan Auman of Designing an MBA. I've taken Megan's digital version of this class, and again there was plenty of new info.  In the late afternoon, we were able to walk the BMAC show floor. I had alternative access because of helping Wendy, so I made multiple passes over the course of three days, gleaning new insights each time.

On Saturday evening, we attended the Niche Award ceremony and cheered loudly for Sophia Georgiopoulou's stunning necklace in the alternative materials category, which won the award. We also cheered for our new friend, amazing jewelry artist Aleksandra Vali's win in fashion jewelry.

The second day of the workshop explored details of the wholesale experience, including:

  1. Creative marketing and sales strategies, covered by Carolyn Edlund.
  2. The artist-gallery relationship illuminated by Wendy Rosen, who founded BMAC
  3. A question and answer session about the show nuts and bolts, such as application, costs, and  the booth package, featuring Rebecca Rosen Mercado.
  4. Interactive sessions with two artists: Matt Thomas, a woodworker, who wrote $60,000 in orders at his first BMAC show last year, and Merrie Boxbound, who has exhibited for many years at BMAC as a polymer clay artists, originally selling jewelry, but now focusing on pens.


The last day also featured the most personal part of the workshop: the critique session. We were allowed to set up representative work in a two foot by two foot space in a controlled access room, where buyers could voluntarily view the wares and provide written feedback. I received a number of reviews, which uniformly agreed that my work is very marketable, but which generally suggested that my price points need to move downward. Since I presented one-of-a-kind work and have yet to develop a production line, that was totally expected.

I came home convinced that I could do the show, if I decide that wholesale is the right direction for me.

Friday, October 19, 2012

Jewelry School Adventures - Hollow Forms

This week I took my seventh class at Jewelry Studies International. Vasken Tanielian demonstrated the class projects will skill and precision, and then I followed along with many mistakes and repairs.


The first project was a domed hollow band, made from two strips of 22 gauge Argentium. The outer band was made 10 mm longer, then domed over a dapping punch until the sides met the inner band. This relatively easy project only took a morning to complete. I added a texturing wheel to my wishlist to get the matte finish on the outer surface. This band will earn a bezel setting sometime in the future.


The second project was an oblong hollow bead. I went off script and used my fine silver bird and leaves in combination with the Argentium wire to make the surface designs. All were fused to the flat sheet and then the strip was formed into the oval. The gauge of metal was a bit lower than planned due to a late shipment, and even Vasken had slumping when fusing the back seam. The weight of my bird on the front made it even more problematic in my case. We all decided to solder on the sides rather than fuse, to avoid further aggravation. I really enjoyed learning to use a homemade point and a hammer handpiece to texture the background.


Next we attacked the box ring with the outer band 15mm larger than the inner. I decided to flip the large side on the outer band because this configuration looked like an egg, which fit with my bird theme. Again, soldering issues were my main problem area. I had one pinpoint area that refused to close when adding the first side. I asked Vasken to help and he soldered it. When I soldered on the second side, I still saw bubbles when I dropped it into the pickle, indicating an air leak somewhere. It turned out to be the original trouble area. After several more attempts to close the hole, to no avail, I finally soldered a small trimming of metal right over the area. So my errors provided me the opportunity to learn how to fix the issue in the future.


When it came time to make the lentil bead with patterned wire overlay, I decided to go my own way again. I fused flowers and leaves onto each dome, then soldered them each to a flat back. No holes this time! And plenty of learning about how to file and sand around the raised elements to get the edges nice and flush. The earrings are a bit heavy, and the backs don't really add anything to earrings anyway. However, I do feel more confident in my ability to handle hollow construction in the future.

Friday, October 28, 2011

My Favorite Class Sample

Class samples are interesting things. They have to be simple enough that even beginners can make them (because there always seems to be someone new diving into metal clay). They also need to be interesting enough to not bore advanced students nor drive me crazy, as I need a new one every time to show construction techniques.

Nesting
My Garden Windows Pendant workshop is all about painting on glass with vitreous enamels and then setting that glass into silver. Although there are many ways to mesh glass with silver, I demonstrate a sample that can incorporate a lot of techniques to increase complexity for those who want to push their skills, but can stay simple for the newbies.

nesting back
The last sample I made included a painting bird and nest with a lot of detail, although there’s a limit to the detail you can put onto a tile 5/8” x 1 1/4” in size. The flat window of this pendant is what makes it simple, but it can also seem limiting. Although I love a basic oval, and have many class samples with that shape, I encourage students to experiment with variations. A slight change in the outline makes the work more original and intriguing. This shield shape is my latest.

Monday, October 17, 2011

Glass Painting and Silver Clay Workshop at Gage Designs

I'm home from my weekend in beautiful Pennsylvania, where I led an exploration of painting on glass and setting glass into silver clay. The class of ten students did some beautiful work. Unfortunately for me, despite sitting in the charger for weeks (evidently unplugged), my camera battery was nearly dead. Luckily, Holly's camera worked!

Enamel on glass paintings by Holly Gage (two on left reverse, others surface)
The class learned two types of painting on glass: surface painting onto an opaque white glass with watercolor enamels and reverse painting onto clear transparent glass with opaque enamels. To appreciate the detail achievable in the paintings by the talented Holly Gage, you need to know that the glass size is 5/8" x 1 1/4"!
Enamel painting on glass
Top, L to R: Helene Richards, Karen Quirk Douglass (2); bottom: Kimberle Gage  Swanson
I also demonstrated my method of setting the glass in silver by pre-firing components and then firing the assembly with glass inserted.

Dorothy Thompson - painted enamel on glass set in fine silver clay
Unfortunately, I didn't get photos of all the work, but these photos were all posted by Holly Gage.
Enamel painting on glass set in fine silver clay
Karen Quirk Douglass
Painted enamel on glass set in fine silver clay
Terri Werner
Can you believe that this wonderful owl pendant was the first metal clay project ever for Terri Werner??? While Terri was a bit intimidated by the skills of her fellow students, I think this is a simply stunning piece!
Enamel painting on glass set in fine silver clay
Kimberle Gage Swanson
This beautiful pendant was designed and executed immaculately by Holly's sister-in-law, Kimberle Gage Swanson, obviously talented in her own right.

Enamel painting on glass set in fine silver clay
Christine Miller

Enamel painting on glass set in fine silver clay
Helene Richardson

It was a great trip. The students were fun, enthusiastic and productive. Holly did an amazing job of preparing and assembling supplies. She and her family also welcomed me into their home, where Holly shared her studio and supplies with me for late night play sessions, while her husband pampered me with gourmet meals (pumpkin lasagna!!) and her daughter, Megan, aspiring veterinarian, showed off her amazing domestic leopard cat and miniature rabbits. After a few days of rain, the weather turned sunny and gorgeous, with trees turning red, an amazing sunset after the last storm, and images recorded in my memory of pristine farms on rolling hills with Amish horses and buggies pattering past. 


Monday, July 04, 2011

Drawing and Painting with Enamels on Copper

My head is full of ideas now that I've spent a week exploring a variety of painting and drawing with enamels. Charity Hall is an incredibly gifted artist who originally trained as a botanist and is married to an entomologist (hence her many bugs). There were many scientists in class; perhaps we just naturally gravitate toward enamels?

Some of the huge number of Charity Hall's enamel samples.
I think the class should be renamed to "Enamels for the Intimidated" or something equally encouraging, since I fear the class title frightened the more artistically challenged. Our class of seven was just over half full, a shame as Charity was a terrific teacher and the material was not inherently difficult. Yes, to draw or paint realistically requires previous training, but most of the techniques had easy and effective applications not requiring so much skill. Everyone in our class loved Charity's shortcuts, developed out of her experimental nature to see what happens if she goes against traditional wisdom. For example, cleaning metal is not really necessary for opaque enamels, although it does matter for transparents.

CW from upper left: sugar coat, transparent green over P3 brushed over chasing, overfired  liquid 969, sugar over P3 and tracing black applied with pen, clear over P3 brushed over chasing, green enamel onto ink stamp on white base coat
The first day was spent making basic samples: sugar, orange peel, and glossy surfaces. We also experimented with simple surface design techniques -- enamel stamping, metal chasing, under and over firing, using black enamel with a pen or brush.

Graphite pencil over enamel base coat.
On the second day we learned to solder on sterling tubes for mounting stones and to prepare liquid enamels. One of the simplest techniques we learned involved drawing with a regular pencil onto a stoned enamel surface. The carbon from the pencil lead is absorbed by the enamel and leaves a permanent,  if faded, image.

CW from upper left: enamel over Micron pen, sugar clear over underglaze pencils, glass painting watercolors, metal watercolors, underglaze pencils, clear over P3 by pen
Next we coated substrates with the liquid enamel for sgraffito and learned to use watercolor enamels in decidedly un-watercolor fashion. Then we mastered using the flex shaft and burs to cut the mountings for the tiny stones.

Sgraffito samples
upper left overfired, center left too thick
upper and lower left with tube mount CZs

For the next to last day, we experimented with glow powder for pieces to be viewed in the dark, fusing silver balls and wire into enamel, drawing with a pen, and underglaze pencils. Finally, there were demos of constructing various simple mountings for enamels, champleve and cloisonne.
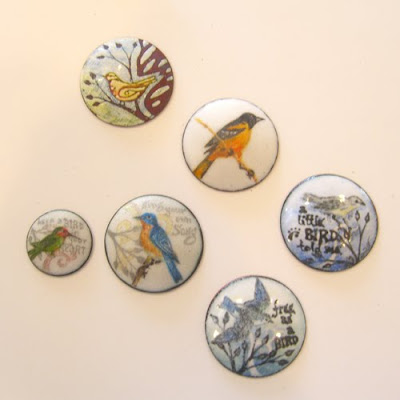
CW from upper left: watercolor over sgraffito, sugar clear over watercolor, base + watercolor + pen + clear,
overfired base + watercolor + pen + clear, base + underglaze pencil + graphite pencil + watercolor + sugar clear,
base + underglaze pencil + graphite pencil + watercolor + sugar clear
I got side-tracked with the painting, which offered the possibility to finally build surfaces in enamel that follow the procedures I use on my bird journal pages. Once I started experimenting with layering the different media, I stopped making single technique samples and started building more detailed trials. Enamels are fussy, requiring close attention in the kiln, and even then I unfortunately overfired several of my favorite samples. I experienced the crackle patterns of transparents over opaques, the ever present burn out of some colors, and loss of detail from a final clear sugar coat. My favorites, of course, look faded and blurred compared to before they headed into the kiln.

I came home with a long list of items to order so that I can continue my experiments and a desire to clean up my studio so that I have a good layout for this work.

Friday, June 24, 2011

Workshop with Charity Hall


I'm abandoning the remodel midway to fly to cooler territory. As if the disarray downstairs wasn't enough, we had the upstairs central heat/AC replaced today. All I can say is 5-6 workers in my house and drive makes for a busy place.


Tomorrow I'm heading out to Idyllwild Arts Center for Metals Week. I'd heard good things about this program and love to venture somewhere new, so when Lora Hart suggested I try it, I jumped at the chance. Not only is it a long workshop, five days, but it's also in cool weather! Out of the six possible options, I chose the enameling workshop with Charity Hall.

I was unfamiliar with her work previously, but the notion of painting with enamels is definitely not new to me. I figure I will probably pick up a few new tricks, as well as have five glorious days to just focus on art without the distractions of a house in flux. When I come back, I expect the granite countertops will be in place and perhaps the appliances will even be installed.

Wednesday, February 16, 2011

Workshop with Sara Sally LaGrand

Last Friday I got to escape to the torch for a full day at a workshop with Sara Sally LaGrand. The topic was silver glass reactions, which those of you who follow my tribulations with that glass understand to be of particular interest to me.


I couldn't resist bringing home a couple of Sara Sally's corsage brooches. This white one, named Tilda after the wicked white witch from Narnia, seemed so nest-like to me somehow that I couldn't resist adding it to my bird themed collection. Probably it's the wispy real feathers peaking out or the spotted glass feathers that brings that feel to me. This one is quite large, hand-size, so I don't think I'll likely wear it, but simply nestle it alongside other pieces from my collection.


Glenda, the good witch from Oz, on the other hand, is small and quite wearable. I loved the complementary orange and violet color palette. And that dashing little orange feather has just the perfect in'souciance.

As for the silver glass, as I was coming to suspect, the upshot seems to be that my mini-CC torch runs much hotter than a Minor, and thus I wind up overheating the glass far too often. Better results were had when I worked much cooler, but even then it was hard to get a good encasement on a large bead without pushing the glass to mud. More time to move glass slowly is needed.

I wish I'd been able to squeeze into her two-day corsage class, since these look so fun to make. I just have to be grateful to have found an opening in the reactions class.

Meanwhile the flu drags me down, so I have yet to complete my Ring a Week #6. Cough, cough...

Thursday, September 30, 2010

Anastasia Workshop, Day 2

I collected my beads today from the second day of the workshop. We started off the day making a floral with enamel stringer watercolor background and flower center murini. I chose different colors from the class sample, as I hate it when all the beads come out looking the same.


Then we moved on to a creativity exercise, adding glass to a base bead until we "saw" something in the glass to work with. I added amber glass to the side of my bead until it started to look like a huge hitchhiking thumb. So I added a fist and then decided it would be more interesting with a forefinger up. The fingernails are pressed in with a tool. When Anja came by, she suggested a few drops of blood, so those are on the extended finger. Finally, I added a cuff and silver glass button.

The wave bead was an exercise in moving glass, sculpting small points without loosing the large mass of the bead. It also has a latticcino cane. The last bead, the coral bead, was the opposite exercise -- working tiny with controlled heat to build up small coral fingers and then add tiny dots and barnacles all over.

Wednesday, September 29, 2010

Workshop with Anastasia

For my birthday, I spent two days making beads with Anja Basan of Anastasia Beads. This was an incredible piece of luck, as she was only teaching in the US at Arrow Springs and here at Blue Moon Glassworks. I originally signed up more than a year ago for the workshop to be held in April. After my accident, I had to cancel my seat. Then the volcano forced the class to be rescheduled, and I was sad that I had given up my place. Recently, when I took my oxygen concentrator in for repair, I found out that there was one opening available, for the class now to be held on my birthday. Providence!


My father sent me money for my birthday, which I used to purchase one of Ana's bird beads, this incredible swan feeding a chick. Thanks, Dad!


During the first day of class, we did numerous small practice beads to learn the trick of working with hair fine stringers and enamels. Considering that I've been off the torch for five months, except for a few practice beads in the last couple of weeks, those fine stringers were a challenge. I'm happy to say that muscle memory is a wonderful thing. I wasn't great, but I wasn't as bad as I feared. These are the practice beads, with different line, dot and enamel techniques.


The big project of the day was learning to make Anja's trademark tree beads. Here are the two I made, along with a spiral/helix bead.

I need to go pick up my beads from day 2, so that I can show them.

Monday, May 31, 2010

Prepping for the Bead & Button Show

Four more days available to do everything needed before I leave for the Bead & Button Show. A little sense of panic begins to invade my space. Here's my reality: I sleep in my living room in a hospital bed because I can't get up the stairs. My usual studio space is up those stairs or down a couple of steps in the sunroom glass studio. I haven't made it up the seventeen steps to the second story yet, but I did get out to the glass studio today by the roundabout route.


I used the walker shown above (see the platform for my right forearm, since I can't put weight on the right hand yet?) to go out the front door over a couple of low steps down. It's safer than letting my husband try to get me out in there in my wheelchair. Then I transferred to the wheelchair and he pulled me backwards over the new decomposed granite path around back (large wheel first is easier over uneven ground). Then he brought the walker around as well, and I could move around the studio. Perched on a tall stool, I cut glass tiles and molds for my students, then ground edges on the molds. It felt so good! And it made me want to spin around and try out the torch.


Yesterday I spent the entire day making tear-aways, reworking my procedure since I was having some issues with poor transfer. So today I have a collection of materials to pack. Check those off the list. Well, I did finish the copper electroforming handouts as well, a time consuming task.

Today I was very productive. Besides the glass work, I made new metal clay pieces for a Garden Window pendant. I need samples at various stages, including fired but unassembled. They're in the kiln now. I edited my handout for that class. And I packed tools and supplies I need for the two classes I'm taking: a glass casting workshop with Susan Lenart Kazmer and concrete for jewelry with Robert Dancik. Two of my favorite teachers, so I should be filled with inspiration before I start teaching.

If you're coming to Bead & Button and have Wednesday free, there are still a couple of seats in my class available. Or just come say hello.

Monday, May 17, 2010

Workshop with Hadar Jacobson

Despite the wheelchair and walker, despite the inability to drive, despite limited utility of the "making" arm, I refused to cancel my weekend workshop with Hadar Jacobson. My angelic husband drove me to San Antonio and returned later in the day to retrieve me, both Saturday and Sunday. He ran up and down the stairs to help me pack tools, searched for the last minute supplies I totally forgot about until time to leave, and even packed drinks and snacks for me.

Hadar is rather an icon in the metal clay community, with a distinctive style of her very own, a beautiful aesthetic that I've admired for years. It was a huge treat to sit beside her for two days, listening to the accumulated wisdom spilling from her soft-spoken lips and watching her worn, stained hands easily forming clay into things of beauty. Although I couldn't afford to purchase the piece of jewelry that called to me (a lucky fellow student took it home), I did so enjoy holding piece after substantial piece, examining the details: design, finish, size. Who knew that fabulous dress was as large as my hand??

We had two main projects in class: copper clay combined with silver or bronze.


The first project involved making copper clay pieces to fire, with holes for later "hot rivets" of silver, torch-fired. I'm afraid my planned earrings are heavy enough to pull my earlobes to my shoulders. I should have made them much thinner and lighter. But I have the concept down, and I can make these into pendants or some such.


The second project started as either bronze or copper clay, deeply textured, then inlaid with the other clay. I experimented with two approaches for the texture, one from my Flock texture, bronze inlaid with copper. I notice that filling around a raised texture leaves the edges open to more erosion during the polishing phase. Obviously there are voids arising from poor filling technique, too. Hadar warned me that my textures were probably not quite deep enough, so I'm happy that it worked this well. I could have polished out more of the roughness, but with a loss of the image, since the copper is clearly thin here. Notes for future applications.


Since I remember liking the carvability of bronze, I tried a simple carved bird on a branch. Let's just say, leaving my Dockyard carvers at home and having limited hand mobility didn't produce anything much. But the concept is good. Better finishing needed, again.

Perhaps the most useful part of the workshop to me was to see Hadar's approach to finishing. We purchased tool kits so that we could use our Dremels to follow her techniques in class. Some of the tools were things I use already, and others I'd read about in her books. Using them her way still seemed different and I'm sure some elements will creep into my later work. Planning ahead for removing material after firing is definitely a different mindset, so I'll have to give it some thought.

It was really nice to feel almost normal for the weekend. Distraction with a fun project took my mind off my leg, but I paid with increased swelling and exhaustion. Everyone was so very helpful in making it possible for me to participate, from bringing me food to ferrying work and materials around for me. An injury does at least make it obvious how many nice people there are in the world. Thanks to all, old friends and new, who helped me have a fun weekend away from my preoccupation.

Saturday, January 16, 2010

More from My Kate McKinnon Workshop

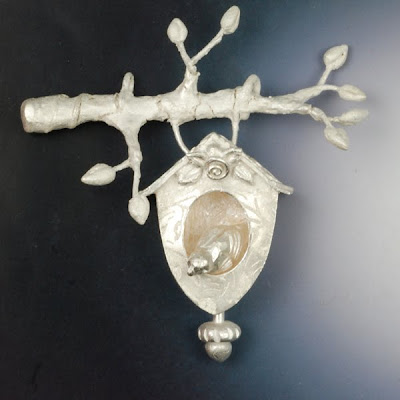
It's been more than two months since I took Kate McKinnon's workshop on boxes and birdhouses. I'm finally trying to complete one of the pieces I started there.


This is one of the pieces that came out of the kiln there with the major glitter effect. Luckily, it seems to have brushed out just fine. It was interesting to note that the fine silver wire that connects the movable bird to the finial at the bottom was also glittery, confirming that the glitter effect has nothing to do with silver clay per se, but rather just silver surfaces crystallizing at a higher than recommended temperature, with a bit of nucleation help from the vermiculite bedding.

One of the most useful techniques I garnered from Kate was using wire armatures for metal clay. I have used wire inserts for connectors and the like, of course, but really thinking in terms of an armature with a skin of metal clay opens up so many possibilities! It has its own issues, too, as you can see if you check the branch carefully. There are cracks in some places that need to be filled and shrinkage has made the wire underneath obvious in others. Nothing that another bit of work won't fix, but it gives me a better feeling for how to work the next time.

The branch was just an obvious extension of the surface branches I do on my own work, so I couldn't resist. It appears that my leaves are stable and the fine twigs are movable. Of course, being that fine may not make this the sturdiest piece of work, but it was a useful learning piece.

I'll repost when I get the repairs finished and the patina added.

Sunday, May 17, 2009

Workshop Thoughts

I had a blast in my two-day workshop with Barbara Becker Simon. We made both a complex porcupine bead and a much simpler donut bead. These are Barbara's samples from her class description page:


The technical details learned are all available in her recently published book, Metal Clay Beads: Techniques, Projects, Inspiration which is absolutely fabulous. We learned about carving texture plates, making polymer clay molds for forms, and (the biggy!) constructing perfect seams. Of course, there was lots more -- embedding wires for pearls, adding color with Prismacolor pencils, carving metal clay, and on and on.

I'm reeling with the implications for my own ideas.

Because of time constraints, we used Barbara's prepared textures and molds, but I'm really looking forward to making my own. Here's my porcupine bead, using Barbara's texture plates (which are going to be manufactured and distributed by Whole Lotta Whimsy, by the way).


Rather than duplicate one of her donut beads completely, I made mine smooth, then carved it before assembling. I've had those carving tools for a while now and not used them much. This was so fun! I got better quickly, and feel that with a bit more practice I'll be able to "draw" at will with a carving tool. I'll be giving this a lot more study.


Barbara was a very clear, prepared, and dedicated instructor. She answered every question and held nothing back. She also freely shared her thoughts about metal clay from a trained metalsmith's perspective, directed students to the work of other artists whose work she admires, and talked about education and marketing for the arts. I learned much more than just metal clay techniques, and I'm sure the benefits will extend into my future endeavors.

Saturday, March 14, 2009

Bronze Clay in Italy

We spent the first two and a half days of the workshop on bronze clay. The primary bronze project was the bracelet that Louise will teach again at Bead & Button:

My attempts at these thin links verified what I've experienced at home: work thicker in bronze than you would in silver. I thought that I could get away with 4 card thickness with a tear-away texture, but then I got inspired to carve the edges a bit and almost every link cracked somewhere. Louise's philosophy is that bronze just requires repair, that it is a step in the creation. I'd prefer to just work thicker and not need to repair and refire, especially with the long firing times.


Firing was a primary issue that limited what we could do. The firing schedule we used was one recently developed by Hadar Jacobson, requiring a fast ramp to 1000°, 100°/hour to 1100°, then a slow cool, followed by another fast ramp to 1530°, held for 2.5 hours. Because of the electrical wiring in the villa, we could not run the kiln and the dishwasher simultaneously (we blew the circuit breaker the first night we tried it). That limited our firings to on average only one per day, working around the dishwashings which were deemed higher priority.

Since we were constrained to a single layer, the box didn't hold a lot of pieces. A couple of students got their bracelet links all fired in the first few box loads, but it took several days before I got anything to show for my efforts. Then a few links went into each load over several days, so that my links exhibit at least four different patinas. And the worst broken links were totally black, but came out more colorful after repair and refiring. This will be one of the first things I do after getting home: refire them all together (after I fix a few more breaks) to make them coordinate before I do the jumpring assembly.


Other pieces I tried included a small bell made from a cutoff hollow lentil, which cracked through where I'd carved it, and didn't fully recover after one repair job. This would simply not be an issue if I'd only worked thicker. You can see the sunken area at the upper left.


The two domed circles I carved that were thicker survived well, although one was in the black patina batch, so got a brushed finish.


We also made a bangle bracelet from a coiled snake. Mine was too thick and didn't sinter properly and broke open. I had the option to do a quick, dirty repair for refiring on the last day, but chose to just bring it home as is. I decided that the knobs I added (terracotta looking in the photo), which are big relative to the bangle to account for shrinkage during firing, just don't suit the bracelet anyway. I think it's probably just easier to remake the whole thing than to attempt repairs. Maybe I can cut a section to use for something else.

Anyway, that was 2.5 days of work. Overall, my assessment is that bronze clay is still a big mystery. I did get to try Hadar's new bronze and copper clays later in the week.