Showing posts with label metal clay. Show all posts

Saturday, September 17, 2011

New Glass & Silver Pendant Finally Finished

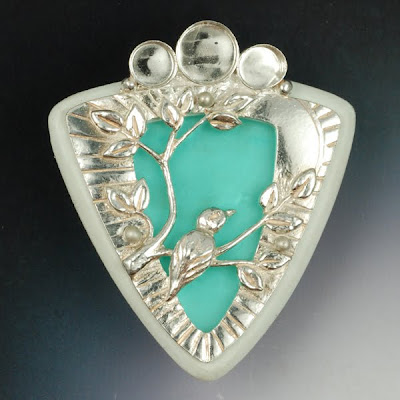
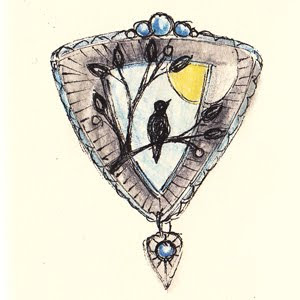
Why do simple ideas sometimes get more involved? I thought I was going to whip out a few simple Garden Window Pendants, but then the muse took over. The simple oval I've used so many times looked flat and boring, so I cut a new shape. Then I had to carve out the corners to make that triangular shape more reminiscent of birdhouses. I decided to fix the flatness issue by adding a couple of bezel set sapphires and a bunch of vine decorations.

Vickie Hallmark hand-painted enamel bird on glass fine silver pendant

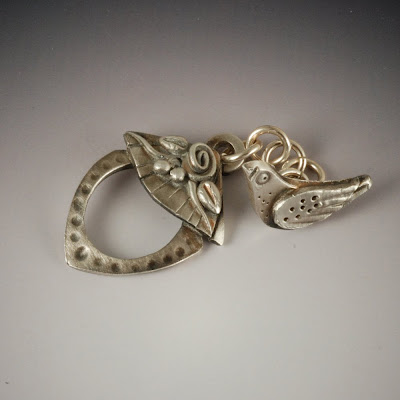
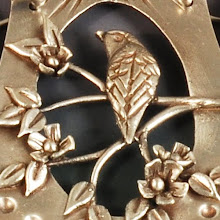
Then the back looked neglected, so I added more leaves and berries there as well. After firing, I tried a plain heavy jumpring bail, intending to texture it with pliers, but that just didn't seem substantial enough. So I cut out a selection of bails. Only to have them be too small after firing. Remember that shrinkage thing, Vic? So I finally got smarter and cut a bail from an index card to match to my original index card template for the pendant. Fool me only once! That simple bail called out for some decorations of its own.

Vickie Hallmark hand-painted enamel bird on glass fine silver pendant back

You can see the next issue coming, can't you? The simple ball chain just won't do. Now I have these visions of a necklace to suit the pendant.

When, oh when, will I get to those other glass paintings?

Monday, September 12, 2011

Art and Design of Metal Clay Jewelry 2012 Calendar Now Ready to Pre-Order!

The fabulous Holly Gage has done it again! Along with jurors Emma Baird, Tracey Spurgin, and Lesley Messam, Holly selected work from over 300 submitted images to fill the pages of the 11" x 17" (open size) wall calendar.


From the gorgeous detail of Terry Kovalcik's locket on the front cover (above) to the work of the three jurors on the back, the calendar is filled with inspiring images of the best in metal clay today. Works from about forty of the best known and most accomplished artists in the field are accompanied by statements of inspiration or technique and website addresses. The calendar includes conference and competition deadlines to keep you on track.


This edition of the calendar is the most eclectic ever, showcasing silver, rose gold, bronze, copper, and steel clays. Take a look at the calendar preview and pre-order your copy today here.


I'm incredibly honored to be included again this year, with my syringe cloissone Vine earrings showing off enamel with silver clay in the month of October.

Sunday, August 14, 2011

Fighting Artistic Resistance

Back in the studio this morning, trying to attract the Muse, I'm pushing ahead on the enamel setting, despite feeling that the work is too much the same as some previous creations (but different enamels). Just do it, I tell myself.

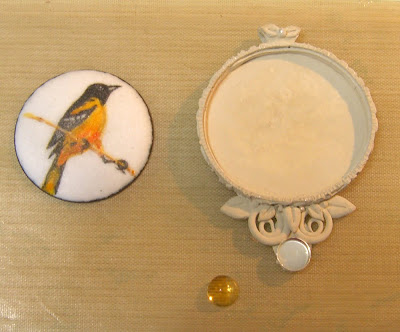
copper with painted enamel of oriole bird set in silver metal clay

When we sit own each day and do our work, power concentrates around us. The Muse takes note of our dedication. She approves. We have earned favor in her sight. When we sit down and work, we become like a magnetized rod that attracts iron filings. Ideas come. Insights accrete. 
-- from "The War of Art: Break Through the Blocks and Win Your Inner Creative Battles" by Steven Pressfield

I realized again today, as many times in the past when I've had a bit of a creative block, that I haven't bought any new music in some time. So I've caved to Reistance long enough to visit iTunes and purchase a couple of new albums. In my memories, specific albums are attached to major work. Something about the music actually makes the connection to the Muse easier. So today, I'm listening to Barton Hollow by The Civil Wars and Brandi Carlisle's "The Story."

Friday, June 03, 2011

Understanding Metal Clay Sintering

Many artists tend to view metal clay as a bit of a voodoo material. They have a recipe that works (usually the manufacturer's recipe), and superstitiously follow it exactly, right up until it doesn't work or they need to do something different, and then they're at a loss. Understanding the process of sintering can help demystify firing metal clay, and allow us to approach new situations with an educated guess as to what might really work.

Composition of Metal Clay

7001 SEM
Metal powder

Metal clay is composed of super-fine particles of metal plus a binder. The metal particles may be all the same identity, such as in silver or copper clay, or they may be a mixture of different metal powders in the cases of bronze or other alloy clays. The binder is present for the express purpose of making the clay malleable, amenable to shaping in various ways. Once the binder burns off in the kiln or torch, what's left is essentially a shape composed of tiny pseudo-spherical particles of metal with lots of air space between them. As you well know, filling a vase full of river rocks leaves a lot more air space than filling that vase with sand. Smaller particles pack more closely, which explains the drive over the years to reduce the particle size of the metal clays. As we see, this has desirable results in terms of strength in the finished product.

Sintering
Between the point that the binder burns off and the finished product comes out of the kiln, a process called sintering takes place. This is very much like what happens when you dump your ice container into the sink. The individual ice cubes stick together, with holes remaining between the cubes. However, the ice in your sink is above its melting point, so it will eventually puddle in the sink. Ice does sticks together even below its melting point, as is obvious in ice makers left for some time. How does sintering actually happen?

Metal Atoms Moving
The key to understanding sintering is energy. Those particles of metal are actually composed of even smaller balls called atoms. The atoms in the center of the particle are happily surrounded by other metal atoms, but the atoms at the surface only have neighbors below and maybe some to the side. Each atom wants to be surrounded by other atoms, but the surface makes that impossible. Even so, the atoms will try to arrange themselves so as to maximize the connections to neighbors and minimize exposure to the outside world. Those little critters are very social and like to be in the midst of a group. Yes, the atoms can move, IF they have energy.

Consider an empty shoebox sitting on a table. Now pour a bowlful of marbles into the box. The marbles are just a mad jumble, probably mounded up in the center. If  the box is jiggled slightly, the marbles will start to move, rearrange and pack tightly. The mound in the center will slowly disappear and the surface will flatten. Those marbles at the top of the pile, touching only a few neighbors (three probably), will eventually wind up in a flat layer surrounded by a hexagon of six neighbors. The atoms deeper down may have neighbors below, above, and in the same layer for a total of twelve. That jiggle applied to the box is heat -- energy that allows the marbles to move.

Now suppose one lonely marble is placed on top of a nice flat, but incomplete, layer. When the jiggling starts, that marble will run around on the surface, here and there, until it finds a hole, whereupon it will drop into the layer with all its friends. Happiness!

What if more heat is added, by jiggling the box more energetically? Then the packing down will happen faster. Unless too much heat is added, at which point the marbles will start to pop out of the lower layers onto the top surface rather than always wanting to drop into holes. That's the melting point -- when so much heat is added that the marbles don't care about staying together nicely. Even more energy might cause atoms to fly out of the box!

Neck Growth
When a metal clay project is formed, the metal grains of atoms are separated by binder, touching each other occasionally. The atoms that exist at those points where the grains of metal touch are happier than the atoms off on the surface by themselves. When heat is added, those surface atoms wander over to hold hands with the larger group, forming a neck between the particles. Eventually the particles become more and more connected, and the holes between them become smaller. Atoms migrate from the surface to fill the voids, which causes shrinkage.


As long as energy is available, the movement continues. First the particles stick together, and then it takes time and more energy to fill in the voids. This is why metal clay fired at low temperature or for short times isn't as strong -- the connections within the piece are smaller. For the strongest, densest material higher temperature and longer firing times are advisable.

Predicting Results
From this understanding of what really happens on a microscopic level during firing, we can make predictions about what might happen in new situations. Heat provides energy for the connecting process to happen and speeds up the work, so increasing the temperature is good, right up until the point that melting is a concern. Because of inaccuracies in thermocouples and variations in heating distributions within a kiln, it's not wise to try to get too close to the actual melting point. That's why the top firing temperature recommendations are typically at least 50 degrees below the material's melting point.

Even so, at lower temperatures, as with stones or glass, sintering will happen but more slowly. It's wise to fire longer if using a lower temperature. Just because the manufacturer's directions give a certain temperature and time doesn't mean that other choices won't work. Just follow the general guidelines -- the lower the temperature, the longer the time. Firing longer than the recommended time is not an issue, and is probably beneficial, although at some point the tradeoff becomes pretty marginal.

With this picture of the microscopic process, we can also start to understand why sintering on the outside can happen while leaving the core of a piece powdery. It takes both energy AND time to do the work of moving those atoms. If the piece is heated very quickly or the piece is thick, the outside layer may become hot enough to sinter, since the atoms don't have to move very far. But the interior may not get warm as quickly, and atom diffusion distances depends exponentially on temperature, so  even a small difference in temperature can result in a huge difference in neck formation. For comparison, moving an atom from the surface of a project into the interior one millimeter away is like driving your car 50,000 miles. Just because the car is at highway speeds doesn't translate to quick arrival. Taking a plane would be better, or a spaceship, and even so it'll still take time.

Conclusions
The upshot is that both time and temperature are important to ensure a well-crafted product. To maximize productive sintering, fire at the highest safe temperature tolerated by the materials in use. To maximize connections between particles, and therefore strength, fire for as long as circumstances allow, factoring in impact on schedule, equipment and personal patience.

complete firing
incomplete firing
The desired result should be to produce a completely fired project, with a surface such as shown in the first image from the PMC website. Low temperature or short time firings may result in incomplete firing, as shown in the second image.

Monday, April 25, 2011

Meadowlark Earrings

I just shipped out a special order pair of my Meadowlark earrings. Somebody very lucky has a spouse who pays attention.

Friday, April 15, 2011

New Directions: Powder Metallurgy (Metal Clay) in a Sheet Metal World, Part 1

I'm delighted to announce that one of my jewelry entries will be included in a fabulous online exhibition titled New Directions: Powder Metallurgy (Metal Clay) in a Sheet Metal World. The exhibition, hosted by Crafthaus,  will be presented in two parts, and Part 1 just opened yesterday. The exhibit is curated by Susan Breen Silvy and Christine Norton and was juried by Ann Davis and Jeannette Foese LeBlanc.


A print version of the exhibit will be displayed at the Metal Clay World Conference in Chicago in July, and there will be an expanded hard-copy catalog from the exhibit available for purchase at that time. The proceeds from sales of the catalog benefit CERF, the Craft Emergency Relief Fund. My work will be presented in the second part of the exhibit, opening on July 17 on Crafthaus.

Included amongst the treasures in this first half of the exhibit are
jewelry,
Lorena Angulo
Bird Nest
vessels,
Catherine Witherell
In Florence They Dance on Mosaic Floors
and functional/decorative objects.
Cindy Miller
Tadpole Spoon

Monday, March 28, 2011

Ring a Week 13/52 - Benefits of Working in a Series

My desk is starting to be littered with rings...and we're only one quarter of the way through the challenge. Because I liked the ring from last week so much, I decided to riff on its design. That brought me to thinking about the benefits of working in a series.


I was quite taken with the simplicity of the design last week. The ring was, in many regards, the easiest and quickest to build of all the rings I've made so far in this challenge. On the other hand, it wasn't by any means the least of the collection. In fact, it seemed rather refined, with the reverse relating so beautifully to the front, the egg shape echoing the nestling, and the satin finish yielding an elegant, polished tone. Where do I go from there? Do I do the obvious and simply reproduce it with a different image in the center? Do I add enamel to bring in a pop of color? Do I set it aside to revel in my feeling that it's superior and I can't top it, so I should go back to another design for a reinvention?

Instead I decided to try a merging of two designs, which is quite typically where I'm always working. I like that "on the fence" place, I guess, where I try to combine two ideas that I've been working on separately to find something new and exciting. That's when I spotted the toggles lying on my work table, victims of a rejected class proposal, looking forlorn and forgotten. One of the toggle rings had a similar shape to my nestling ring, with an oval opening in the center. Ah...I could cut my top a tad differently and add an extra triangle for a roof to make a birdhouse ring!

Away I went to quickly cut out the pieces needed, deciding to place a perched bird inside the birdhouse. That's where I erred a tad. I placed the bird too high, forgetting that the roof would hide its face, leaving it a birdhouse for a headless bird. Not quite what I had in mind! So I omitted the roof and just embellished directly with rose and leaves. I guess I have another iteration to try for next week.

I'm missing my Master Muse tutorial sessions. I enjoyed designing the projects and photographing all the steps and writing out instructions. I wonder if there would be any market for small PDF tutorials to sell through my Etsy shop. Beadmakers do this all the time; perhaps it's time for metal clay to get in on the fun. This birdhouse toggle clasp is first in line for such an experiment.

Saturday, March 19, 2011

Ring a Week 12/52

I found a new simple ring design that I love. I think I might make a whole handful of these. Here's the first, Nestling.

Fledgling Bird Ring by Vickie Hallmark in fine silver. bird, tree, branch, nest, baby, metal clay, pmc

Fledgling Bird Ring by Vickie Hallmark in fine silver. bird, tree, branch, nest, baby, metal clay, pmc

It was rather serendipitous design. I cut an oval and then a frame for it that had a hole too small. As both were drying, I cut another image into the proper size oval. Eventually I stacked them all up with the ring embedded between. Easy as it possibly could be.

And I finished ahead of my deadline this week!!! See the rest of the challenge offerings at the Ring a Week Flickr site.

Tuesday, March 15, 2011

Ring a Week 10 and 11/52 -- Metal Clay Strap Band RIngs

This week I made two rings to make up for one of the weeks I missed due to being away. After prowling through my sketchbooks for new ideas (why haven't I drawn anything in there lately??), I decided to try a new strap band ring design. The band was fired flat, then drilled and attached to the top with beaded rivets.


I'm not crazy about this strap band design. The rings feel too flat and dimensionless to me. The strap band attaching at the edges makes the ring shank less than round. I did like the ring face designs, so I think I'll try to do the shank differently with a similar top. Even as I write this, modifications are popping into my head. Next week's ring is coming right along (maybe I'll even be on time).

Monday, March 07, 2011

Ring a Week 7, 8 and 9

Finally, I'm catching up a tad on my ring design. As you can see, I have plenty of ideas to explore, but time to execute is sorely lacking. Today's offerings aren't quite up to my standards, as I see some finishing issues I slighted by rushing to get all three rings into the kiln last night. I suppose this is how I learn which things need more attention.


First, I wanted to incorporate a larger stone, so I built a mounting for this 12x8 mm pear shaped purple CZ. My method for using polymer clay to create a mold for the mounting was a bit clumsy and more tricky than it needed to be, but now I have new ideas for how to do that more simply next time. I inserted the CZ with mount into a cutout in a domed disc, knowing that shrinkage would distort the circle to an oval. I planned my design to incorporate that and it seems to have worked fairly well, although there is some asymmetry that I would like to learn to control better.


Second, I decided to try a tube mount for a faceted round blue spinel. I learned this technique from Gordon Uyehara at a workshop in Florence, Italy several years ago, but haven't used it since. Even then, I modified the technique to avoid the seam in the tube because of fears of it popping open during shrinkage around the stone. This time I tried Gordon's method and, while the seam didn't open, I can SEE the seam, so I obviously didn't get it perfectly merged. Tricky, tricky. I also had an issue with hiding the seam in the wrap around the ring liner. I thought I would hide the seam completely with leaves and details, but wound up liking the simpler look that leaves that seam a bit too exposed. I did a bit of repair and refired, but it still isn't up to my standards. The concept is interesting however. There are many possibilities to ponder.


Finally, I slapped together another plain domed disc ring made with a texture of one of my Zentangle drawings. This ring I find extremely effect for its simplicity to construct.

Lessons to work on:
  1. Plan better for shrinkage of metal clay vs. other materials, either fine silver or stones, including distortion and reinforcement.
  2. Consider how to make ring inserts blend more effectively: file down edges after shrinkage? Wrap? 
  3. Think more about how revealing macro photos appear -- why do I always see defects here that aren't apparent to me at the stage where it would be easier to correct? Do I need to look at pieces with a loupe? Or buy serious magnifiers? 

Sunday, January 09, 2011

Ring a Week 1/52

Speaking of being sucked into challenges! Last year I was insanely jealous of the treasures posted in the Ring a Day challenge, but knew for certain at the beginning of the year that 2010 was not a year that I could make such a commitment. So this year I was pleased to see a more moderate challenge, a ring per week. I decided to honor my desire from last year and take on another challenge. Normally, I'm not much of a challenge type. I prefer to do what I want to do, so the only way to suck me in is to make the challenge align with my own intrinsic direction.


I started off with a simple project, utilizing a piece that has been lying on my bench since August. There were some issues with the fine silver bezel that made it not work for mounting the enameled copper dome that was intended, so it was tabled. Polymer clay allowed me to cope with those issues, quickly finish the ring (a plus this busy first week), and still keep in step with my usual body of work.

To see the offerings of the 200+ members of the Ring a Week challenge, check out the Ring a Week Flickr account.

Sunday, October 03, 2010

Meadowlark Earrings

It feels great to have a bit of time this weekend to catch up. I've made a few glass beads (eek! still can't do what I want to do!), torched some enamel on copper, and even put together some jewelry.


These darling Meadowlark Earrings are now available in my Etsy shop. Hand-formed birds and branches suspended across open windows, with the sun shining in the background. They might be my new favorites! I tried a new ear wire style, with a catch on the back. Pretty easy to do, and much more secure. I'm tired of losing one of a pair!

Friday, July 09, 2010

Learning from Mistakes

During my recent class at Bead & Button, one of the students made an error in sizing for the two parts of a Garden Window pendant. It's an easy mistake to make. Concentrating on making the window opening the right size can lead to overlooking the outside dimensions of the front piece, which have to completely cover the box which holds the painted glass.

I suggested a quick addition to the student's window front to deal with the error: a rolled snake of clay all around the perimeter. It was such a nice addition that I had to make one myself once I got home.


It just goes to reinforce the idea that mistakes are good. They are simply design opportunities. Truly, the measure of an artist is not what you can do the first time out, it's what you can fix.

This piece is a good example of how one thing leads to another. It's a Garden Window pendant, certainly. But it got a bezel set moonstone cabochon, since I've been incorporating a lot of those lately into earrings. And the shape came from the painted fabric and stitched metal ornament I made when visiting fiber friends and the birdhouse I designed in Kate McKinnon's workshop. It all works together to move us forward.

Wednesday, June 16, 2010

Being a Teacher at Bead & Button, Class 1

Wednesday was a rough day for me, starting at 6:30 am when I ferried myself on my electric scooter over the roller coaster skyway from the Hyatt to the convention center, followed by my husband pushing a laden cart and my wheelchair. My classroom was in the far back corner of the show floor. Luckily, no carpet made pushing myself around in the wheelchair easier, because I proved myself reckless while trying to rearrange tables and chairs pushing from the back of the scooter. No further bodily damage ensued, thank goodness!

Soon we had the aisles wide enough for me to zip through, electricity wired in for all the power equipment, and all the boxes unloaded into a huge mass of supplies. My Garden Window class is a very tightly timed class, as we run the kiln four times to get the pieces all finished. I literally have a printed timeline that I consult to make sure we're staying on track. There are a few things that I typically get done before class starts that I didn't this time because of the extra room rearrangement, so I felt behind even before I started.

I, and especially the students, were extra lucky to have superstar Gordon Uyehara volunteer as my assistant for the day. Thanks, Gordon, it would have been much tougher without you!


First we drew the black outlines onto glass and fired the tiles.


Then we added color and refired. Talented group, aren't they? Everyone loved the glass painting part of the class. I think they could have spent all day doing just that part, so I'll have to rethink whether or not to change the class for next year.

By late morning however, we'd changed to silver clay so that I could show how I make my box design to hold the glass. I carefully loaded two shelves of silver into the kiln during lunch, without double checking the position of the thermocouple. Unfortunately, I blocked it, so the top shelf got hotter than desired. Chalk one disaster up to moving too quickly!

Some pieces had the dreaded (or loved) glitter effect that comes when the temperature is pushing dangerously close to the melting point, but not so much that a brass brushing wouldn't resolve the texture. A couple of box backs were so glittery as to loose all texture. And one lonely, thin front window melted into a complete puddle. I now know where the hot spot in my kiln is located.


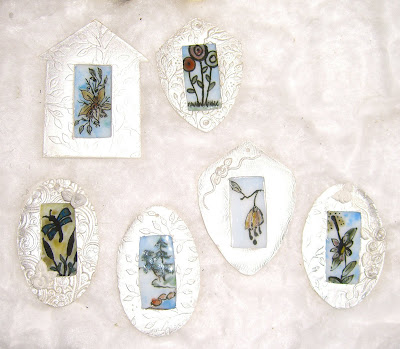
Luckily, my victims were good sports and the worst pieces were replaced with my prefired sample pieces to continue on with the process. Several students took their pieces home to fire, so I can't show them all. These six all turned out quite nice, and will be even more lovely after patina and finishing.

As soon as class ended, we rushed to pack and vacate the room in the one hour allotted before the next class started. We hauled everything back to my hotel room, dumped everything, and I collapsed with my throbbing leg elevated. After an early dinner, we reloaded jewelry, books, business cards and postcards, and headed back to set up for the Meet the Teachers reception. Because of my accident, I didn't get a chance to make the things I'd planned to take for sale, but I did luckily have the earrings from my Month of Earrings Challenge. My table wasn't completely bare!

I didn't sell a lot, because I didn't have components, tools or kits available for this crowd of make-it-themselves types, but many people seemed interested in the classes. My textures got a lot of interest, so when those become available, I think they will do very well.

The reception ended at 11 pm, at which time we repacked again, toodled back to the hotel, stood in a long elevator line to transport both the scooter and wheelchair up to the room, and then collapsed into bed. I can only be thankful that I didn't get the two classes on consecutive days as I requested, but I had Thursday off so that I could sleep in the next morning.

Thursday, January 14, 2010

Iteration -- Third Time Is Charm

Iteration involves repeating a process over and over, slowly zeroing in on a target result. Computational science couldn't exist without this concept, but artists don't necessarily think of such scientific methods in their artistic pursuits.

I, however, am busily engineering new ideas in metal clay, and the process of iteration applies perfectly. What it means to me is TIME! If only I executed in gigaflops, I'd have this all behind me. Instead, I have days' worth of work invested.


First, I drew designs in my sketchbook, brainstorming mechanics in my head. Can I do it?? Will it work? How will I do this aspect? The structure was pretty basic to test the hidden functionality. Then I made the first iteration: functional, true, but that simple structure was a bit (lot!) less than my artistic inner critic requires. Hmmm. Holding a piece in hand is definitely more helpful than sketches or mental visualizations.

Next, I sketched again, modifying the design to alter the issues with the first design. To remove the "clunky" feel and add a bit of bling with a jewel. This version was quite a step up from the first in complexity, but had a nice finish to it. Unfortunately, technical issues hindered perfection in function.

Howl! First, I was functional, but not artistic. Now I'm artistic, but non-functional. Can't I be both???

So, a third iteration is on my workbench, pretty much a duplicate of version two, but with a few minor tweaks to fix the technical issues. The results you ask? Why, that's a super secret! Look for a BIG announcement next week and details of this project a few more weeks down the road.

And please let the third time be the charm!!

Saturday, December 05, 2009

The Ultimate Publication: My Own Books!

For several years now, I've been saying I wanted to use the new on-line technologies to produce a book of my work. I remember the old days, when I printed out glossy photos of my quilts on my home printer, fussing and fuming, and then took the results off to be bound at a local print shop. Have things ever changed!! Now we can all have professionally printed books that look like they were mass produced, but we can order just a few...or even only one.

When my friend, Judy Perez, who is a graphic artist by original profession, announced her book of art quilts, I thought "I have to get this done!" Knowing that she was a pro and had probably really researched the technologies available and selected the best, I decided to follow her lead and use blurb. blurb makes it very easy to design your own book. Your download their software, then either use their provided layouts or make your own with text and photo boxes. The most time required was to search back through stored photo files to find originals, so I could have nice high resolution graphics.


The first book I designed is Birdwatching: a metal clay adventure, which details my series of bird-themed jewelry made of silver or bronze combined with gemstones, painted glass, enamel, resin and faux bone. I decided to intersperse some selections from my collection of quotations, those that were related to birds. Then I got carried away using my bird drawings to illustrate the pages. I'm quite happy with this impromptu book and thinking perhaps I should actually PLAN a book and see where that goes.


That first book was so fun and easy that I quickly started a second book titled Copper On, Copper Off: an electroforming adventure, which refines and expands upon my online electroforming tutorial, which has been extremely popular. This book has more text, as it details the background, theory, equipment, design, operation and finishing of electroformed glass beads. Extras in the book are a page of sources and a troubleshooting guide, as well as dozens of photos of my electroformed beads. I also describe my carved copper electroforming technique.

Both books can be previewed at the blurb site, where you can also order them in softback or hardback editions. I still need to do some tweaking to the cover image to be able to off the image wrap edition in the future. I purchased one copy each of the soft and hard covers to compare and proof, then made a few corrections/additions before releasing them both to the world at large.

I've ordered a stack of books for Christmas gifts this year, and I plan to offer them for sale in my classes and at the Bead & Button Show next year. And even more book ideas are percolating in my head. Can you believe that blurb offers a service to easily convert your blog archives to a book??? BlogSlurper will take your Blogger, TypePad or WordPress blog and convert it for you. Imagine the possibilities!

Monday, November 16, 2009

Studio Rules: No Procrastination and More

Procrastination -- the bane of productivity!!! I know this about myself: if I can keep the momentum, I can accomplish great things. If I start procrastinating on something, bad consequences soon follow.


Take for example, my resin project. My deadline was to finish it by the end of October. So here it is the middle of November and it's still sitting on my table, looking forlorn, while I anguish over which back piece to add, faux bone or silver. Two weeks ago I committed to silver, cut the piece out and let it dry, dry, dry. The faux bone piece was cut and shaped a month ago. Meanwhile I dithered over how to attach the pendant to a neck cord or chain. The original sketches had simple jump ring attachments at the corners, but I worried that might not look quite elegant enough with the rest of the piece.

Enough being enough, I urged myself to just decide and move on. Saturday, a trivial tube bail was added and the piece was fired. Sunday the tumbler spat the front, back, and a dozen other pieces all over, along with soapy water and stainless steel shot. Ah, this is what happens when I procrastinate. Obstacles appear, as if by magic.


Studio cleanup (of that small area anyway) complete, I continued with the construction, thinking a few rivets would have this piece behind me. I marked the three rivet hole points with a center punch, drilled the first, and inserted the ball rivet. Then the second. When I got to the third, there was a problem. That tube bail that I had agonized over was in the way!! Back in the day of corner jump rings, a center top ball rivet seemed expedient, but now there's no way to hammer inside that bail.

What to do? I could rivet at the corners, but that ruins the whole idea of my rivets integrating with the tree design. I could toss the silver back aside, and retrieve the faux bone from my table. I could add a few more rivets that semi-incorporate with the tree.

Procrastination -- the bane of my work.

New studio rules:


  1. No procrastination. Once a piece is started, it must be finished quickly (within a few days). Plan ahead. Order supplies early; finish commitments early.
  2. Clean up. Put things back where they live. Enough with this searching high and low for the polishing point mandrel that's not in the box with all the points.
  3. Double and triple check. No more forgetting to turn on the intake fan when the exhaust fan is on. No more loose knobs on the tumbler.
  4. No second guessing. Just do it. The muses don't like my questioning their inspiration.
  5. Persevere. The only way to get back in good graces with those muses is to push on through and do the hard work. Don't give up.

I think I'm going to post these on my wall. And for what it's worth, I'm laughing at myself over all of the goofs in the last few days. I've only detailed a few here, but the list just goes on and on. It's either tragic or hilarious. I insist on being optimistic because it's my experience that when I encounter a run of obstacles like this, there's a big reward if I just believe in myself and fix it all.

Monday, November 02, 2009

More Textures for Metal Clay


Yesterday my local metal clay group had a meeting to play with texture making. Although I had recently purchased conventional Speedball linoleum cutters and printing blocks, I'd yet to give them a go. With a bin of small blocks at my side, I doodled away, slowly getting the feel of the tools.


While more useful for deeper textures, it was quite possible to do very low relief. I'm excited about the prospects of multiple heights to the impressions in metal clay. That's one of the things that's both useful and frustrating about the other methods of making texture plates that I've shown: it's harder to do multiple levels. Carving blocks allow more options with easy access.


These blocks are all approximately business card size.

We also used two-part silicone mold mix to take textures from found objects: lots of shells, coral, buttons, picture frame molding, etc. What a perfect thing to do while sitting in the sunshine on a lovely fall day.

Wednesday, October 21, 2009

Cover Girl

There's a new magazine on the near horizon, one devoted to metal clay! Metal Clay Artist Magazine is the brainchild of Jeannette LeBlanc. The first issue is due out any minute now, and on the cover is my very own photo of Flock, my bronze link bracelet made with photopolymer plate impressions of my original drawings.


I've had quilts and glass beads published in many different publications, but this is the first metal clay piece to make it into print -- on the cover, too!


Don't you need a subscription of your very own? Check out the preview issue.

Sunday, October 04, 2009

Resin Inlay Pendant, Version 2


I had some time at the library on Friday to sketch for a while, so I tried new versions of the resin inlay pendant.


This is the version I like best. I've already done the top piece in metal clay and shaped the faux bone. I'm waiting on cabochons and bezel cups to proceed.


Guess I should make the layers clear. The top sketch is the front piece, sculpted in metal clay with the branches and bird suspended over the opening. The second image is the back, made of carved faux bone. The third image is an interior layer of faux bone that shows around the edges. It has a cutout to give room for an inset of resin and found objects behind the bird and branches.